
eRacks Systems Tech Blog
Open Source Experts Since 1999
Fedora 28 Released!
Fedora 28 is now available on all eRacks systems.
“Choose Freedom. Choose Fedora.â€
    Surprised! Well this tag line is directly from the Fedora 28 official website, a complete Linux based Operating System. Fedora released their ‘Fedora 28 Final version‘ on ‘2018-05-01‘. It is very well known that ‘Fedora’ is always free for anyone to use, modify, and distribute. It is built and used by people across the globe who work together as a community known as ‘The Fedora Project’. Under the tagline Fedora offers,
“Less setup, more innovation. Choose a flavor of Fedora
streamlined for your needs and get to work right away.â€
    Fedora 28 provides software to suit a wide variety of applications. The storage, memory and processing requirements vary depending on usage. For example, a high traffic database server requires much more memory and storage than a business desktop, which in turn has higher requirements than a single-purpose virtual machine.

Fedora 28
Fedora 28 is offered in 3 different streamlined flavors as,
    As flavor Fedora Workstation is a polished, easy to use operating system for laptop and desktop computers, with a complete set of tools for developers and makers of all kinds.
    Fedora Server is a powerful, flexible operating system that includes the best and latest datacenter technologies. It puts you in control of all your infrastructure and services.
    And Fedora Atomic provides the best platform for your Linux-Docker-Kubernetes (LDK) application stack.
What’s New in Fedora 28!
    It’s a great thing that Fedora 28 Accepted System Wide Changes Proposals and these changes have been made by the Fedora Engineering Steering Committee for the Fedora 28 Release as System Wide Changes.
Fedora 28 Boost 1.66 upgrade
    This change brings ‘Boost 1.66.0’ to Fedora 28. This will mean F28 ships with a recent upstream Boost release.
The aim is to synchronize Fedora with the most recent Boost release. Because ABI stability is one of explicit Boost non-goals, this entails rebuilding of all dependent packages. This has also always entailed yours truly assisting maintainers of client packages in decoding cryptic boost-ese seen in output from g++. Such care is to be expected this time around as well.
AArch64 Server Promotion
    Fedora community promoted Aarch64 server technologies to Primary Architecture status. This would include the Server installer, the DVD installer ISOs, the Cloud (qcow2 images) and Docker base images to the same status as other primary Server architectures. This would NOT currently include other components such as Workstation images/installs, any of the various spins, or Fedora Atomic components.
Though Fedora developers are looking to promote their AArch64 / ARM64 / ARMv8 server offerings to being a “primary architecture” for this next Fedora release but The Fedora AArch64 server installer, Cloud images, and Docker base images would be the same status then as the other primary server architectures like x86_64.
This promotion wouldn’t affect Fedora Workstation 28 with 64-bit ARM not being a primary architecture on that front for the time being. Additionally, it wouldn’t affect Fedora Atomic either.
The Red Hat / Fedora developers are confident in their AArch64 support now and believe on the server front it’s ready to be a primary architecture.
Among the supported AArch64 platforms by Fedora include the 96Boards HiKey, 96Boards Dragonboard, ARM Juno, Rapberry Pi 3, Pine64, and others.
GNOME 3.28
    Fedora 28 will also feature the latest version of GNOME desktop environment, GNOME 3.28. GNOME 3.28 has some improvements to the Calendar, Contacts and Clock apps. The default Cantarell font has been updated as well. Default video and music players of GNOME now support more media formats.
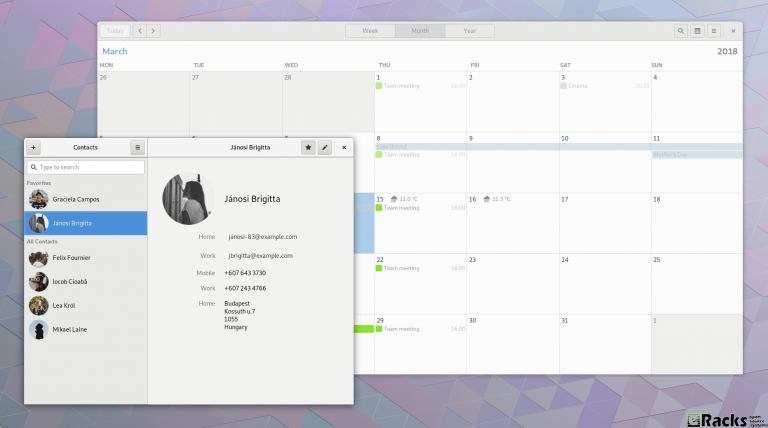
GNOME 3.28
A new Usage application has been introduced in GNOME 3.28 for examining CPU and memory consumption.
You can find the new features in GNOME 3.28 on its official website.
Anaconda modularization
    Anaconda installer splits into several modules those communicate over DBus using stable API.

Anaconda Modularization
When talking about the Fedora/RedHat Anaconda installer it still brings back bad memories from the Anaconda fallout a few years ago when they went through some painful transitions that also led to release delays. In 2018, Fedora/RedHat developers are taking up the initiative of modularizing the Anaconda installer.
For the Fedora 28 release due out this spring, the plan is to split the Anaconda installer into several modules that in turn will communicate with eachother using a DBus API. The modularization effort sounds nice as long as it goes smoothly and doesn’t lead to any fallout like with past Anaconda overhaul initiatives (though admittedly Anaconda has been playing nicely the past number of releases and no complaints on my end currently).
Annotated Binaries
    This change causes extra information to be stored in binary files compiled by gcc. This information can be used by scripts to check on various features of the file, such as the hardening options used or potential ABI conflicts.
A new feature being considered for Fedora 28 is Annobin as a new GCC plugin that would implant extra information into generated binaries.
The GCC Annobin plugin would store extra information within binary files. Among the possibilities are storing ABI details, hardening options, or other build information into binaries that in turn could be picked up by used by other scripts for e.g. detecting potential ABI conflicts or embedding unit test results.
Annobin stores information in Fedora’s toolchain watermark format and currently this plugin is just for GCC.
The proposal for incorporating Annobin by default in Fedora 28 is outlined on the Fedora Wiki while this change more broadly outlines their toolchain watermark work.
Already this proposal has received some criticism, namely that embedded extra information into binaries will increase the file size but this embedded information isn’t relevant to all users, so perhaps it may be better kept into the debug-type builds.
Cloud-base and Container images for s390x
    This change is to bring s390x architecture closer to other Fedora architectures by adding widely used Fedora variants. This includes container images and Cloud-base images (qcow2 and raw format).
Deprecate TCP wrappers
    TCP wrappers is a simple tool to block incoming connection on application level. This was very useful 20 years ago, when there were no firewalls in Linux. This is not the case for today and connection filtering should be done in network level or completely in application scope if it makes sense. After recent discussions I believe it is time to go for this package, if not completely, then at least as a dependency of modern daemons in system by default.
Add-On Modularity
    Beginning in Fedora 28, Fedora will provide a new set of repositories for software and updates with alternative versions from those shipped in the default release.
Improved Laptop Battery Life
    No more manual tweaks! Fedora 28 will deploy several tweaks on its own to provide improved battery life. Improve Fedora (Workstation) Battery Life by enabling various hardware power-saving features by default.

Improved Laptop Battery Life
    Fedora 28 will have the following power management tweaks:
- Enabling auto-suspend for Intel HDA codecs saves around 0.4 W.
- Enabling SATA ALPM by default saves up to 1.5 W.
- Enabling i915 Panel Self Refresh by default saves around 0.5 W.
With these tweaks in place, some laptop models will see up to 30% of battery life improvements. While ‘power users’ can do these tweaks manually and achieve the same result, the idea is to provide an out of the box experience to every Fedora user. Indeed, a good thinking there.
Drop TCP wrappers support, OpenLDAP defaults to use only Shared System Certificates
    TCP wrappers are being deprecated in Fedora. Also, upstream discourages its usage in favour of other means of protection (e.g. firewall). After this change OpenLDAP will no longer be affected by TCP wrappers configuration.
In order to go forward with adoption of SharedSystemCertificates after this change OpenLDAP clients and server will default to use only the system-wide certificates store.
Switch OpenLDAP from NSS to OpenSSL
    Currently, OpenLDAP in Fedora is compiled with NSS (aka MozNSS) for crypto. OpenLDAP is going to be compiled with OpenSSL, instead.
Reduce Initial Setup Redundancy
    Currently there is a high level of redundancy between the Anaconda installer and gnome-initial-setup. This change aims to eliminate these redundancies and streamline the initial user experience in Fedora Workstation.
To make Fedora more beginner friendly, Fedora 28 Workstation will have fewer ‘questions’ to answer at the install time. There will be no root password anymore and the user password itself will be sufficient for the root actions, same as Ubuntu.
There will be some more code changes to reduce the redundancy between Anaconda installer and gnome-initial-setup.
Ruby 2.5
    Ruby 2.5.0 is the latest stable version of Ruby. Many new features and improvements are included for the increasingly diverse and expanding demands for Ruby. With this major update from Ruby 2.4 in Fedora 26 to Ruby 2.5 in Fedora 28, Fedora becomes the superior Ruby development platform.
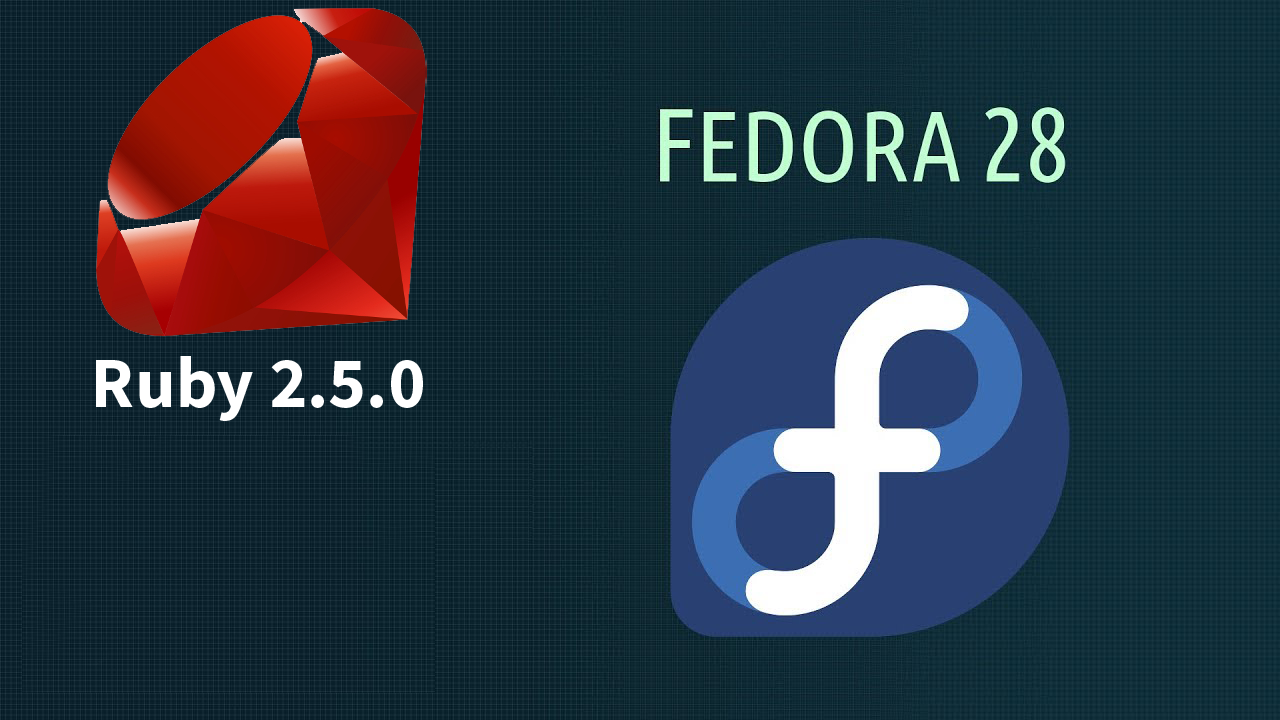
Ruby 2.5.0
Packaging Rust applications/libraries
    Added required tools/instructions for packaging applications/libraries written in Rust. Rust is a systems programming language that runs blazingly fast, prevents segfaults, and guarantees thread safety.
Enabling Python Generators
    This change enables the ability to choose to use the Python module dependency generator for packages that provide Python Egg/Wheel metadata.
Django 2.0
    This change is about upgrading python-django to version 2.0. The latest Django release drops support for Python 2, but a few Django apps packaged in Fedora do not yet support Python 3. A compatibility package will be provided for those.
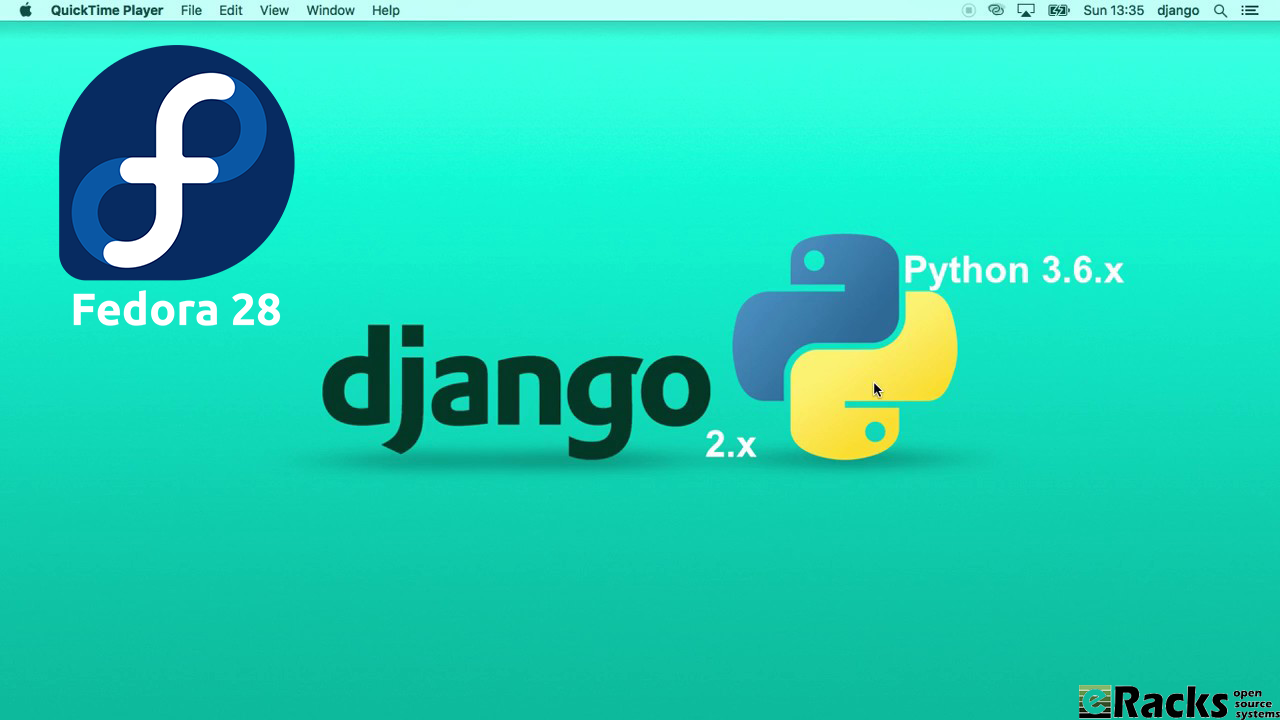
Python 3.6 + Django2.0 on Fedora 28
Kerberos in Python modernization
    Replace usage of python-krbV and pykerberos with python-gssapi in all Fedora packages to enable their removal from Fedora. rharwood will author all necessary code changes; no new code from maintainers is required.
VirtualBox Guest Integration
    VirtualBox is popular, easy to use virtual-machine software. The purpose of this change is to ship the VirtualBox guest-drivers and -tools by default in the Fedora workstation product.
Fedora 28 will see the addition of guest-drivers to the Fedora kernel package, packaging the userspace-tools (VirtualBox Guest Additions) and adding the VirtualBox Guest Additions package to the default package list for the Workstation product.
This means using Fedora in VirtualBox will have a better experience.
Stratis Storage
    Add initial support for Stratis, a local storage management solution. This will allow initial testing and user feedback that will guide Stratis’s development and stabilization.
VA-API 1.0.0
    This change is about upgrading libva and others to version 2.x. This change affects several multimedia players as there are both API and ABI changes. This will allow some VA-API backends to be updated, improving support for recent hardware.
librealsense2
    A new version of librealsense has been released, which does not support older camera versions. Bump librealsense to the new release and add the old library as librealsense1.
java-openjdk 10 – rolling release for Short Term Support releases of OpenJDK
    OpenJDK have release cadence of 6 months. but 3/4 of them are Short Term Supported for 6 months only. This package is designed to harbore them. Currently it is built on openJDK 10. LTSs (next is 11) will go as separate packages.
PHP 7.2
    Update the PHP stack in Fedora to latest version 7.2.x.
    Including these Engineering Steering Committee also made others important change as
- GCC8
- GHC 8.2
- The GNU C Library version 2.27
- Glibc collation update and sync with cldr
- Hardening Flags Updates for Fedora 28
- IBus Unicode Typing
- Switch libidn-using applications to IDNA2008
- NIS switching to new libnsl to support IPv6
- NSS Default File Format SQL
- Rename “nobody” user
- Replace glibc’s libcrypt with libxcrypt
- Strong crypto settings: phase 1
- Removal of Sun RPC Interfaces From glibc
- Golang 1.10
- Switch libcurl to use libssh instead of libssh2
- A new time tool version 1.8 has changed output format.
- Make authselect default tool instead of authconfig
- Binutils version 2.29.1
- Update Erlang/OTP to version 20.
- Update fontconfig package to Fontconfig 2.13 as latest version.
- Update the giflib package to the latest giflib-5.x version (currently 5.1.4).
- Update Sugar to the new upstream 0.112 stable feature release.
- Enabled Thunderbolt 3 peripherals in a secure way hardware out of the box.
eRacks/NAS6
Get your Systems as per-configured with Fedora 28 or with any other Open Source Operating System from eRacks Store.
Minimum System Configuration for Fedora 28
    The figures below are a recommended minimum for the default installation. Your requirements may differ, and most applications will benefit from more than the minimum resources.
- 1GHz or faster processor
- 1GB System Memory
- 10GB unallocated drive space
Low memory installations
    Fedora 28 can be installed and used on systems with limited resources for some applications. Text, VNC, or kickstart installations are advised over graphical installation for systems with very low memory. Larger package sets require more memory during installation, so users with less than 768MB of system memory may have better results preforming a minimal install and adding to it afterward.

Installation Fedora 28
Note:For best results on systems with less than 1GB of memory, use the DVD installation image.
Display resolution
    Graphical Installation requires 800×600 resolution or higher
Graphical installation of Fedora requires a minimum screen resolution of 800×600. Owners of devices with lower resolution, such as some netbooks, should use text or VNC installation.
Once installed, Fedora will support these lower resolution devices. The minimum resolution requirement applies only to graphical installation.
Minimum Hardware for Accelerated Desktops
    Fedora 28 supports most display adapters. Modern, feature-rich desktop environments like GNOME3 and KDE Plasma Workspaces use video devices to provide 3D-accelerated desktops. Older graphics hardware may not support acceleration:
- Intel prior to GMA9xx
- NVIDIA prior to NV30 (GeForce FX5xxx series)
- Radeon prior to R300 (Radeon 9500)
- CPU Accelerated Graphics
Systems with older or no graphics acceleration devices can have accelerated desktop environments using LLVMpipe technology, which uses the CPU to render graphics. LLVMpipe requires a processor with SSE2 extensions. The extensions supported by your processor are listed in the flags: section of /proc/cpuinfo
Choosing a Desktop Environment for your hardware
    Fedora 28’s default desktop environment, GNOME3, functions best with hardware acceleration. Alternative desktops are recommended for users with older graphics hardware or those seeing insufficient performance with LLVMpipe.
Desktop environments can be added to an existing installation and selected at login. To list the available desktops, use the dnf grouplist command:
Install the desired group:
Or, use the short group name to install:
Get Fedora 28
    If you want to have your system pre-configured with Fedora 28, simply choose as your Fedora Linux 28 Workstation / Server or Atomic for your “Operating System’ option with eRacks/FLASH10 or with any other system from eRacks Store. You Could call or email us for the configuration details. We do cover your requirements with our systems.

eRacks/FLASH10
    Or, Fedora 28 is available to download in ISO format from here. It is available in various flavors mainly Fedora 28 Workstation for desktops, Fedora 28 Server for servers and Fedora 28 Atomic for containers.
Asif Raihan May 8th, 2018
Posted In: New products, News, Open Source, Operating Systems
Tags: fedora, linux, Open Source, operating system
Install and Configure Bind9 DNS Server service on Ubuntu 16.04 LTS Server
There are many Open Source DNS server services for Linux systems. Here we’ll discuss about installing and configuring one of the most popular DNS server services among them known as “Bind9â€. We’ll use another most popular Debian based Linux server operating system distributed by Canonical which is Ubuntu 16.04 LTS Server edition.
Other good DNS implementations include the native OpenBSD DNS implementation, as well as Dan Bernstein’s tinyDNS (AKA djbdns), but these are topics for future articles. (We use djbdns on OpenBSD, internally).
Successfully installing and configuring Bind9 Server service on Ubuntu 16.04 LTS server edition require several steps. For better understanding we’ll divide the total process into two main steps as ‘Basic installs’ and ‘Securing the DNS Server’ service. Each main category could be divided into several additional steps.
Basic Installing Steps:
- Install fresh Ubuntu 16.04 LTS Server OS on a server.
- Preparing the Ubuntu 16.04 LTS Server OS for installing Bind9 DNS Server Service.
- Install Bind9 DNS Server Service and configure Caching-only name server.
- Install and configure Primary DNS server or Master DNS server.
- Bind9 Post installation Configurations for successful service run on Ubuntu Server.
- Install and configure Secondary DNS server or Slave DNS server.
Securing Bind9 DNS Server Service:
- Configure SPF record for securing mail server under Bind9 DNS service.
- Configure DKIM record for securing mail server under Bind9 DNS service.
- Configure DNSSEC signing on Bind9 DNS Server Services.
- Configure DMARC Record for securing mail server under Bind9 DNS service.
For this tutorial we’ll use ‘eracks.com’ as domain and local IP address for demo and real time configurations (tested) behind the NAT network. The global & dedicated Systems could be configured just by replacing with your own domain and real IP assigned from your ISP. If you need further assistance please contact our eRacks Systems’ experts. Also, you could buy securely configured “DNS Server†as your requirements from eRacks Systems’ showRoom without any hassle. For your requirement please checkout.
For configuring DNS Servers we’ll use private IP from 192.168.88.0/24 network block where the usable Host IP Range is: 192.168.88.1 – 192.168.88.254; and Subnet Mask: 255.255.255.0. Our Router/NAT-gateway IP address is already configured as 192.168.88.1.
IP Address Block:	192.168.88.0/24
Usable Host IP Range:	192.168.88.1 - 192.168.88.254
Broadcast Address:	192.168.88.255
Total Number of Hosts:	256
Number of Usable Hosts:	254
Subnet Mask:	255.255.255.0
Wildcard Mask:	0.0.0.255
| Options | Primary/Master DNS Server | Secondary/Slave DNS Server | Client/Host Server |
| Host Name | dnsmaster | dnsslave | hostserver |
| Domain | eracks.com | eracks.com | eracks.com |
| IP Address | IPv4: 192.168.88.17 IPv6: ::8817 |
IPv4: 192.168.88.250 IPv6: ::8250 |
IPv4: 192.168.88.17 IPv6: ::8221 |
| FQDN | dnsmaster.eracks.com | dnsslave.eracks.com | hostserver.eracks.com |
Enough talk – Let’s see how it’s done!
eRacks/DNS

Get your Own Open Source DNS Server as pre-configured as ‘plug & Play’ from eRacks Systems’ ShowRoom.
Step 1: Install fresh Ubuntu 16.04 LTS Server OS on a server.
For learn how to install a fresh copy of Ubuntu 16.04 LTS Server OS on a server system visit this link.
Step 2: Preparing the Ubuntu 16.04 LTS Server OS for installing Bind9 DNS Server Service.
After installing, login the server directly or using SSH tunnel with IP address with user with root privileges.
The login screen will look like this;
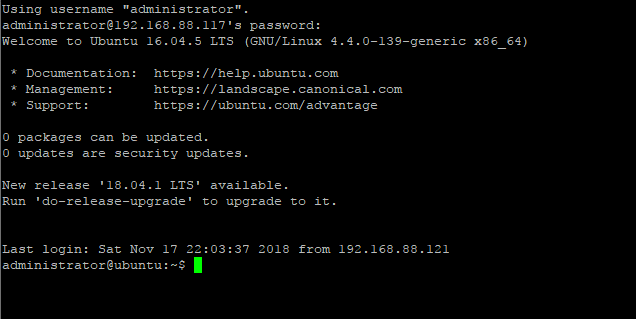
Then run the following command and press enter and your given password to update the system.

For avoiding “sudo” command, we’ll configure the server as ‘root’ user. To do so, type the following command and press enter.

Once the Update and Upgrade are done as root user, we need to edit the network interface for setting up the static IP address for the system with the following command;
Here On the popped-up screen find # The primary network interface and replace the beneath lines with the following;
# Static Primary Network Interface IPv4 Address
# Required for IPv4 (A) Records
auto eth0
	iface eth0 inet static
	address 192.168.88.17
	netmask 255.255.255.0
	network 192.168.88.0
	broadcast 192.168.88.255
	gateway 192.168.88.1
	dns-nameservers 8.8.8.8 8.8.4.4
	dns-domain eracks.com
# Optional Static IPv6 Address for Primary Network Interface
# Required for IPv6 (AAAA) Records
iface eth0 inet6 static
	address fe80::215:5dff:fe58:6500
	netmask 65
	gateway fe80::2a3b:82ff:fe74:58f6
Once it is done, press Ctl + X to exit and Press ‘Y’ then Enter button to save the changes.
Next, we need to set up the hostname for this server. Thus, Run the following command to edit the host name;
On the popped up screen replace the existing default host name “Ubuntu 16.04 LTS” with “dnsmaster†(since we’ll be setting the hostname as “dnsmaster“) then Press control + X to exit. And Press ‘Y’ then Enter button to save the changes. And then Run the following command to edit the hosts file;
Replace the existing with the following host record entries with the following;
The entries will look like this;
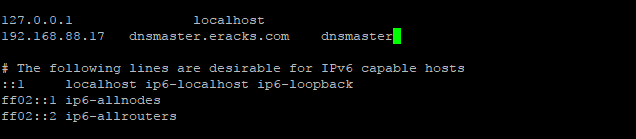
Once done, press control + X to exit and Press ‘Y’ then Enter button to save the changes and reboot your system with the “reboot” command.
After rebooting and login to the server we’ll see that the default host name “ubuntu” is replaced with hostname “dnsmasterâ€. To get assure we could check the hostname and FQDN with the following commands respectively;
root@dnsmaster:~$ hostname -f

Once these are done the system is ready for installing the Bind9 DNS Server Service. And we could proceed to the next steps.
Note:We’ll login as as root user from the start.
Step3: Install Bind9 DNS Server Service and configure Caching-only name server.
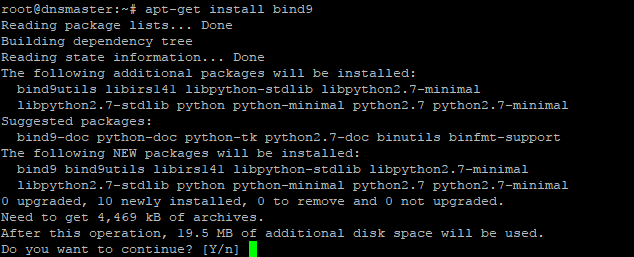
Before installing ‘Bind9’ DNS Server on this server we need to make sure all the packages are up to date. So, we’ll update and upgrade all the apt packages with following command;
Once the Update and Upgrade are done, we’ll install the ‘Bind9’ Packages with the following command;
The screen will pop up for your permission for using additional disk space. For approval, press “Y†and then Enter button for installing the packages. The installation process will take a few whiles.
When the installation is done the system is ready for configuring Caching-only name server with Bind9 DNS Server service package. For configuring Caching-only name server run the following command.
On the popped-up screen find & uncomment the forwarders & set the forwarders as follows with google public DNS IP address & or with your ISP’s DNS IP address.
The entries will look like this
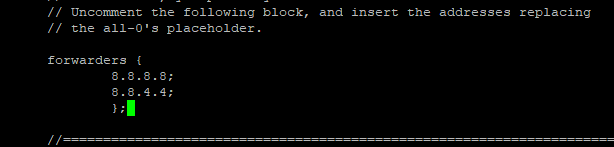
Next, press control + X to exit and Press ‘Y’ then Enter button to save the changes. And restart the Bind9 DNS Service with the following command.
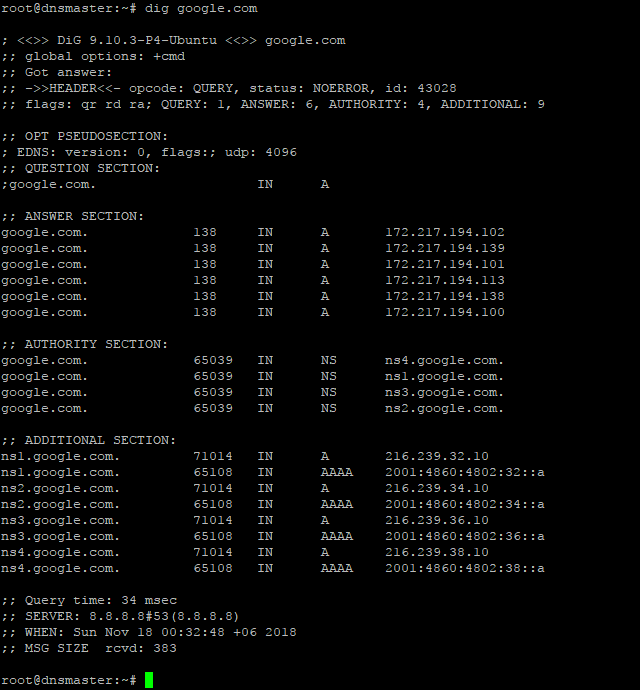
For testing the Caching-only name server we need to run the dig command as follows;
If everything is okay, the command will dig up the following records;
Step4: Install and configure Primary DNS server or Master DNS server.
Before proceeding further, first we need to make sure the Ubuntu server is up-to-date. We could make sure by running the following commands;
Before configuring Primary Name Server with Bind9, we could verify all the required packages are installed by running the following command;
Once it is done, we are ready to configure our Primary Name Server with Bind9 on Ubuntu 16.04 LTS Server. And All configuration files be will be available under /etc/bind/ directory. To do so, we need to edit ‘named.conf.local’ file first, and make entry for our domain zone.
So, we’ll run the following command line for setting up our domain’s forward look up zone.
Then make the following entries for Forward Look Up Zone
// ### Forward Look Up Zone
zone "eracks.com" {
	type master;
	file "/etc/bind/forward.eracks.com";
	allow-transfer {none;};
	};
Reverse, look up zone is also recorded here. So, we’ll add the reverse look up zone with the first there part of the IP address in reverse way by ending with “.in-addr.arpaâ€. The zone name it’ll look like “88.168.192.in-addr.arpa” this. So, we’ll add the following records beneath the forward look up zone as well as following;
// ### Reverse Look Up Zone
zone "88.168.192.in-addr.arpa" {
	type master;
	file "/etc/bind/reverse.eracks.com";
	allow-transfer {none;};
	};
These entries will look like this;
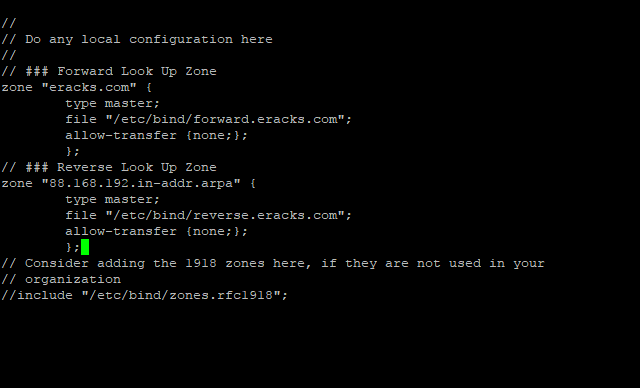
Then we need to save the file and exit.
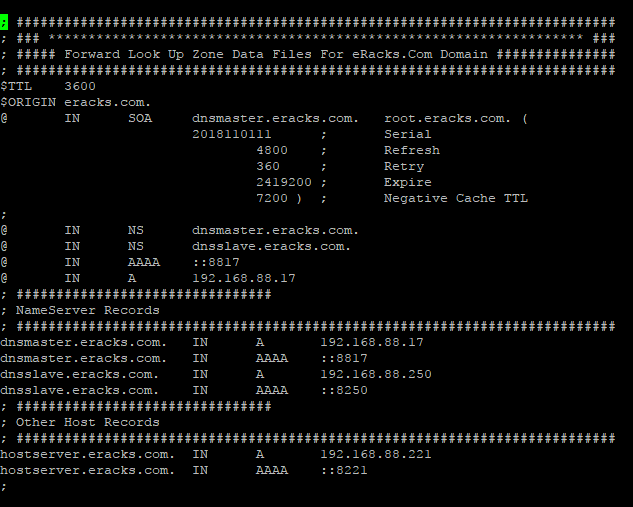
We’ve identified forward lookup zone via “file “/etc/bind/forward.eracks.comâ€;†and reverse lookup zone via “file “/etc/bind/reverse.eracks.comâ€;†on the “named.conf.local†file. Therefore, we need to create those two-database files for use as forward & reverse lookup zone under “/etc/bind/†directory.
For “forward.eracks.com†database, we’ll copy the existing “db.local†database file that is created as default with Binid9 installation under ‘/etc/bind/’ directory. To, do so we’ll run the following command;
Then we’ll edit the newly copied database file with the following command;
Then make the following entries for the database records;
; ###########################################################################
; ### ******************************************************************* ###
; ##### Forward Look Up Zone Data Files For eRacks.Com Domain ###############
; ###########################################################################
$TTL    3600
$ORIGIN eracks.com.
@	IN	SOA	dnsmaster.eracks.com.	root.eracks.com. (
								2018110111	;	Serial
										4800	;	Refresh
										360	;	Retry
									2419200	;	Expire
										7200 )	;	Negative Cache TTL
;
@	IN	NS	dnsmaster.eracks.com.
@	IN	NS	dnsslave.eracks.com.
@	IN	AAAA	::8817
@	IN	A	192.168.88.17
; ################################
; NameServer Records
; ###########################################################################
dnsmaster.eracks.com.	IN	A	192.168.88.17
dnsmaster.eracks.com.	IN	AAAA	::8817
dnsslave.eracks.com.	IN	A	192.168.88.250
dnsslave.eracks.com.	IN	AAAA	::8250
; ################################
; Other Host Records
; ###########################################################################
hostserver.eracks.com.	IN	A	192.168.88.221
hostserver.eracks.com.	IN	AAAA	::8221
;
It’ll look like this;
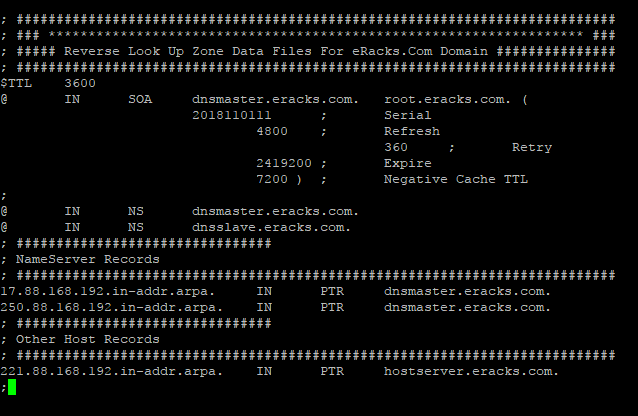
Next for “reverse.eracks.com†database, we’ll copy the existing “db.127†database file that is created as default with Binid9 installation under ‘/etc/bind/’ directory as well. So, we’ll run the following command;
And edit using the following command
Entries for the database are follows
; ###########################################################################
; ### ******************************************************************* ###
; ##### Reverse Look Up Zone Data Files For eRacks.Com Domain ###############
; ###########################################################################
$TTL    3600
@	IN	SOA	dnsmaster.eracks.com.	root.eracks.com. (
								2018110111	;	Serial
										4800	;	Refresh
										360	;	Retry
									2419200	;	Expire
										7200 )	;	Negative Cache TTL
;
@	IN	NS	dnsmaster.eracks.com.
@	IN	NS	dnsslave.eracks.com.
; ################################
; NameServer Records
; ###########################################################################
17.88.168.192.in-addr.arpa.	IN	PTR	dnsmaster.eracks.com.
250.88.168.192.in-addr.arpa.	IN	PTR	dnsslave.eracks.com.
; ################################
; Other Host Records
; ###########################################################################
221.88.168.192.in-addr.arpa.	IN	PTR	hostserver.eracks.com.
;
Once it is done, we’ll save the file and exit.
It’ll look like this;
After that, we’ll restart the bind9 DNS Server Service with the following command.
root@dnsmaster:~$ service bind9 status
Note: We should be careful that all the records that finishes with letter (other than IP addresses), we need to add full-stop (“.â€) at their end point to declare it is finished. Else, the bind9 will show an error.
For instant checkup, we need to set the resolver with nameserver as localhost IP 127.0.0.1 using following command;
And at the beginning of the name server lists we need to add the following line, then save and exit.
nameserver 127.0.0.1
For checkup we’ll use the “dig” command for specific host record like following
The command will dig up the host records from the local DNS Server as follow

If the configuration is correct then the above command will not show any error. or if there is any error, we need to look at log file and troubleshoot the error. For detail about bind9 troubleshooting on Ubuntu Server please visit Ubuntu’s official “DNS Troubleshooting Page” or contact eRacks Systems’ expertise for the help.
Step 6: Bind9 Post installation Configurations for successful service run on Ubuntu Server.
When, the bind9 shows no error, we need to set the post installation configuration for Bind9 DNS Server Service to run successfully on Ubuntu Server. To do so, we’ll run these following commands for give appropriate access permission to the Bind9 Server Service and Allow through Ubuntu Firewall (ufw).At first, we’ll enable the bind9 DNS Server Service at the system start up with the following command. So that the Bind9 always starts automatically after the system reboot.
Then for the access permission for Bind9 on ubuntu server, we’ll run the following commands;
root@dnsmaster:~$ chown -R bind:bind /etc/bind
We’ll also configure the Ubuntu firewall in order to allow Bind9 through Ubuntu firewall (ufw). For configuring ufw we’ll run the following commands one by one.
root@dnsmaster:~$ ufw allow “Bind9”
root@dnsmaster:~$ ufw reload
root@dnsmaster:~$ ufw status
root@dnsmaster:~$ ufw status verbose
Then we’ll restart both servives Bind9 and the ufw with the following commands;
root@dnsmaster:~$ systemctl restart service.service
We could always restart and check status of the Bind9 DNS Server Service with following command.
root@dnsmaster:~$ service bind9 status
If everything is alright, the Bind9 status report will show no error. Beside, we could always visit this MxToolbox website for more detail reports and troubleshooting by entering the domain.
Asif Raihan May 8th, 2018
Posted In: How-To, Linux, Open Source, servers
Tags: linux, Open Source, tutorial, ubuntu