
eRacks Systems Tech Blog
Open Source Experts Since 1999
Microsoft Acquires Github
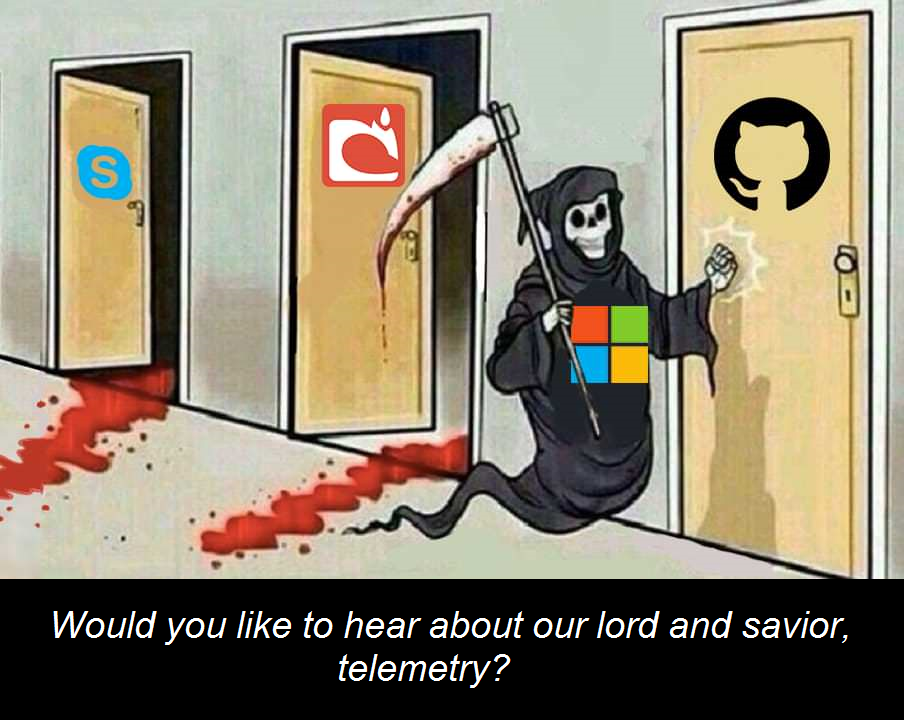
Microsoft Reaper
Shortly after the first news appeared, that Microsoft was in the process of buying Github, a new Github repo appeared –
This repo quickly soared to the #1 spot in the “Trending” area on Github, and as this was politically inconvenient, it was removed by Github without notice or reason given.
Sadly, I expect this to be the future of Github, now, no more transparent bastion of Open Source and code.
Wired Magazine has an article saying as much, and laments that it’s inevitable that Github will be come more restrictive, take down controversial repos, and stop hosting projects which are not in Microsoft’s interest.
When I saw the photo at the right, my first reaction, was “Yes! But why only Skype and Mojang?!” – So, this prompted me to write, on the spur of the moment, the following letter as a comment on the Github issue:
The row of doors isn’t nearly long enough. This has been going on for 4 decades.
A few notable examples from memory, without having to research or refer to the many books about Microsoft and/or Bill Gates:
From the eighties:
Quarterdeck systems – QEMM – (Quarterdeck Extended Memory Manager) a utility which made better / efficient use of DOS “High” memory above 640K. Microsoft cloned a vastly inferior version of the product, and bundled it for free with a newer version of DOS, thus killing the market for the product.
From the nineties:
Digital Research – DR Dos – a superior DOS clone. Microsoft introduced a vaguely-worded dialog box, in it’s apps (eg, early MS Word [UPDATE: Windows 3.1]) which it displayed when it figured out it was running on top of DR dos, which used simple FUD (without any actual faults) to scare people away from DR DOS.
The code to detect DR DOS, was encrypted and hidden, and was obviously written to do nothing but target a competitor – this was discovered and dubbed the infamous AARD code, written about by Andrew Shulman and covered in countless publications including Dr Dobbs, etc
Yet no DOJ inquiry or any other action was taken, despite obviously breaking several laws against anticompetitive behavior, and then hiding it (shows intent).
From the 90s / 2000s:
Novell, Word Perfect (Maybe MS was just after Provo, UTAH? JK) – Both these stories are more well known –
WordPerfect was the only real competitor to the mediocre-at-best MS line of productivity apps (no incentive not to be mediocre, that way they can sell you a new copy every year or two of the product you already bought, and call it an “Upgrade”) – and MS killed the superior WordPerfect Write and Quattro Spreadsheet products with a weak “Look-and-feel” lawsuit – which they LOST, but not until the parent company was destroyed and unable to recover.
Novell is a more involved story, but suffice it to say that they again, like QEMM, built a successful product on DOS’s shortcomings – which then simply acted like product feature vetting for MS, so they could build / buy or copy the solutions that Novell introduced, thus rendering Novell redundant (in the British sense).
From the 2000s / 2010s:
Borland – Despite a vastly superior suite of developer products, MS poached it’s head developer and architect, Anders Heijlsberg, to be their head architect for .NET. His first task was to specifically copy several key innovations from Borland, which supposedly (according to MS) didn’t violate any copyright or IP agreements from the departing Borland – although this was controversial, again, lawsuits or the threat thereof were used effectively by MS to prevail.
This Rant / Diatribe
Sorry, I got carried away – 🙂
This was written on impulse, as a reaction to the door photo, completely off the top of my head in about 20 minutes, without so much as a quick Google to check dates, so forgive me if the above has minor issues to correct – I will update if I need to make corrections, but I do know from memory, that it’s essentially correct.
I remember these events over 3-4 decades, because of the MS’s consistently appalling and astounding behavior, that has continued unchecked, and remains to this day still unpunished and unaddressed, despite a slap on the wrist from our country’s DOJ, and from Europe, who’s various efforts to stop MS’s anticompetitive behavior were ineffective at best, and simply encouraged them to play brinkmanship at worst and improve their knowledge of the line, so they could push it.
I write this because MS’s behavior, as I slowly learned by experience of living though the above events, and the light slowly dawning on me that this was a pattern, and not just one or two coincidental events, is what motivated me to start my company, and try and have a higher bar for ethics and how to treat one’s competitors – and to encourage, foster, and sponsor more egalitarian software products and superior technical solutions in the process.
Republish
Feel free to republish this, along with the reaper image (it doesn’t make sense without it), wherever you see fit.
Sincerely,
Joseph Wolff
Founder and CEO
eRacks Open Source Systems
Founded 1999
eracks.com
We have our code on Github too. We’re looking for where we’re going to move.
Maybe we’ll self-host, or use our colo and hosting resources to host a new Git-like startup for Open Source?
j
Update 6/7/18: corrected software that raised DR DOS dialog box (Windows 3.1), added references to AARD and FUD.
joe June 7th, 2018
Posted In: Open Source
Tags: Build-buy-or-bury, business practices, Embrace-and-extend, Ethics, FUD, Github, Machiavelli, Microsoft, Windows
Ubuntu 18.04 LTS (Bionic Beaver) is out!
    Ubuntu 18.04 LTS (Bionic Beaver) has been released on 26th April 2018 following its planned release schedule. Canonical named this Long Term Support version with codename “Bionic Beaverâ€, where ‘Bionic‘ is an adjective meaning to have or use an artificial, typically electromechanical, body part. And a ‘Beaver‘ is large nocturnal rodent able to swim in water. Beavers are famous for building dams, canals, and homes along river banks.

Ubuntu 18.04 LTS (Bionic Beaver)
    On 26 January 2018, Will Cooke (Desktop Engineering Manager) wrote in an Ubuntu’s Blog post about Ubuntu 18.04 LTS (Bionic Beaver) as, “Bionic Beaver, the codename for the next Ubuntu LTS release, is due in April 2018 and will ship with both the traditional Xorg graphics stack as well as the newer Wayland based stack, but Xorg will be the default.â€
Ubuntu 18.04 LTS (Bionic Beaver) Support lifespan
    Ubuntu 18.04 is an LTS version, which means that the ‘main’ archive of Ubuntu 18.04 LTS will be supported for 5 years until April 2023 from its release date April 2018. Ubuntu 18.04 LTS will be supported for 5 years for Ubuntu Desktop, Ubuntu Server, and Ubuntu Core. Ubuntu Studio 18.04 will be supported for 9 months. All other flavors will be supported for 3 years.
Compared with the previous Ubuntu LTS edition (Ubuntu 16.04.4 LTS Xenial Xerus), there are a lot of changes in the new Ubuntu LTS release (Ubuntu 18.04 LTS Bionic Beaver).
Let’s see what’s new in Ubuntu 18.04 LTS Bionic Beaver release:

What’s new in Ubuntu 18.04 LTS (Bionic Beaver)
Xorg will be used by default instead of Wayland
    Ubuntu 17.10 used the Wayland graphics server by default. With Ubuntu 18.04, the default graphics server will change to Xorg. Wayland will still be available as an option, but Xorg will be the default, out-of-the-box one. The Ubuntu Desktop team decided to go with Xorg for its compatibility with services like Skype, Google Hangouts, WebRTC services, VNC and RDP, and more.
Xorg with Ubuntu 18.04 LTS
Ubuntu 18.04 minimal install option
    Ubuntu 18.04 will use Ubiquity, the Ubuntu installer you’re probably already familiar with. Though the developers plan on implementing Subiquity, 18.04 will use Ubiquity, which will have a new “minimal install†option that you can choose during setup. Minimal install basically means the same Ubuntu, but without most of the pre-installed software. The minimal install option saves about 500 MB, and is only 28MB in size when it is compressed.
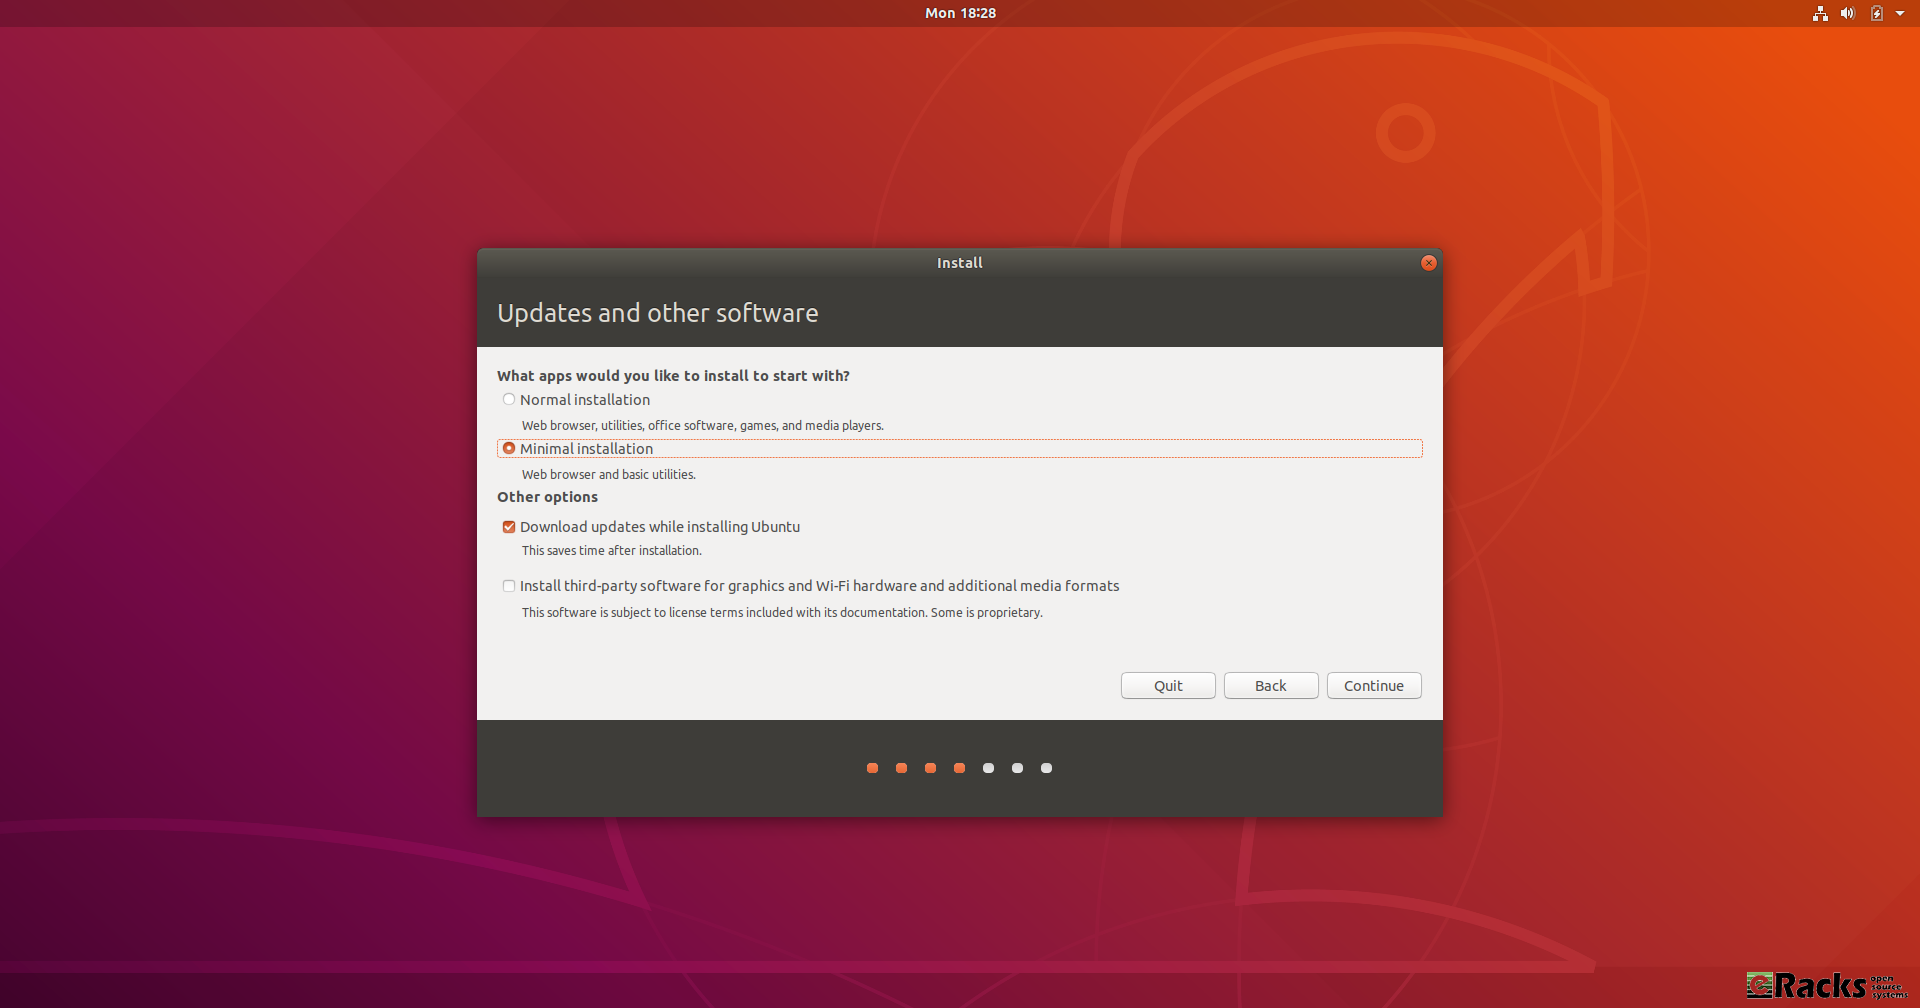
Minimal Install
CPU usage improvements and bug fixes
    The most notable improvement will be in CPU usage. The Ubuntu Desktop team has greatly improved and reduced the CPU usage caused by Ubuntu 18.04. They’ve also fixed hundreds of bugs and made hundreds of other small improvements.
Software, updates and other tweaks
    If you missed the Ubuntu Welcome tool you can still enable LivePatch via Software & Updates. Open Activities and search for Software & Updates.

Software & Updates.
    From the Updates tab you can enable and disable Live Patch:

Enable/ Disable Live Patch
    There are some other useful settings in GNOME Control Center which you might like to toggle:
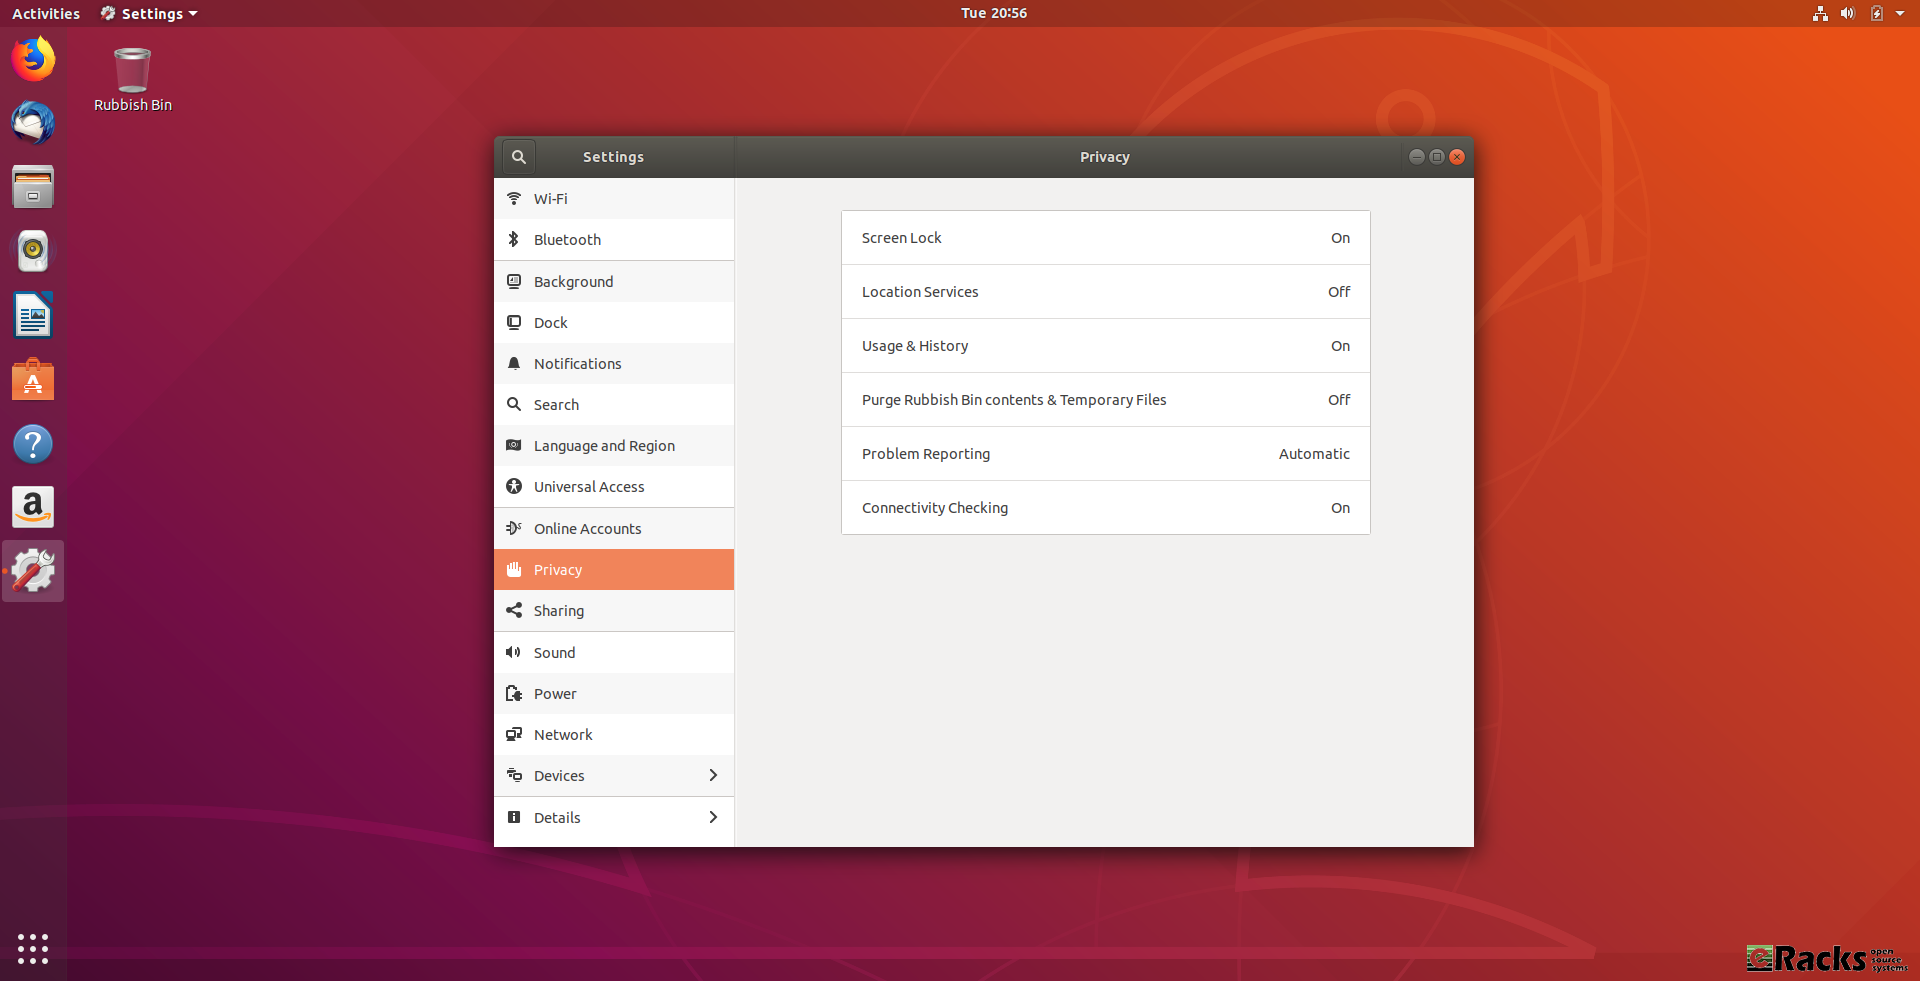
GNOME Control Center
    By enabling Location Services your clock can automatically switch to the correct time zone for where you are which is useful for frequent travelers. By enabling automatic error reporting crash reports will be automatically generated and uploaded. By collecting these error reports, Canonical can easily spot trends in common problems and make sure they work on getting the most common bugs fixed first.
Ubuntu 18.04 Desktop will have a new theme
    Ubuntu 18.04 will ship with Ambience and it won’t use a new theme by default. The new Communitheme won’t even be installed. The Desktop team has decided to do this for various reasons, including bugs and lack of testing.
Luckily, you can still use the Communitheme, but you’ll have to install it yourself. The Communitheme can be installed easily via a snap, but you can always install it manually.
New Communitheme with Ubuntu 18.04 LTS
GNOME Desktop Environment
    Ubuntu started using the GNOME desktop environment with Ubuntu 17.10 instead of the default Unity environment. Ubuntu 18.04 will continue using GNOME. This is not a major change to Ubuntu, but GNOME has also done a lot of changes to their desktop environment, as well as new features. An improved dock, an on-screen keyboard, and more.
GNOME Desktop Environment
Ubuntu 18.04 Desktop will have a new app pre-installed
    The new LTS desktop release will ship with a new app pre-installed by default. The app is GNOME To Do and it’s a very useful app for organizing lists, tasks, and more. You can prioritize them. color them, set due dates, and a number of other features.
GNOME To Do
Applications will be installed as snaps by default
    They been planning on using snaps for a while, and they finally shipped GNOME Calculator as a snap instead of a deb. This is a test to help the Desktop team find and fix any bugs. They’ll later on move more applications to snap in the final release. Using snaps will make the process of installing and updating apps much easier. You can even install snaps on any distro and device.
Some New Apps
Some New Apps
    New snaps are being added to the store all the time, and you can already download essentials like Spotify, Skype and Slack. You can browse the full range of applications via GNOME Software (click the Open “Software†now button) or access the highlights directly by clicking on their icon.
A Brand New Icon Set
A Brand New Icon Set
    Open source icon project Suru has been incorporated into Ubuntu 18.04. These icons were originally seen in the abandoned Ubuntu Touch mobile operating system. Despite hopes to the contrary and a dedicated community project, Ubuntu 18.04 will not boast a fresh new look. However, while the Ambiance theme is hanging around, new icons are expected in Ubuntu.
Color Emojis
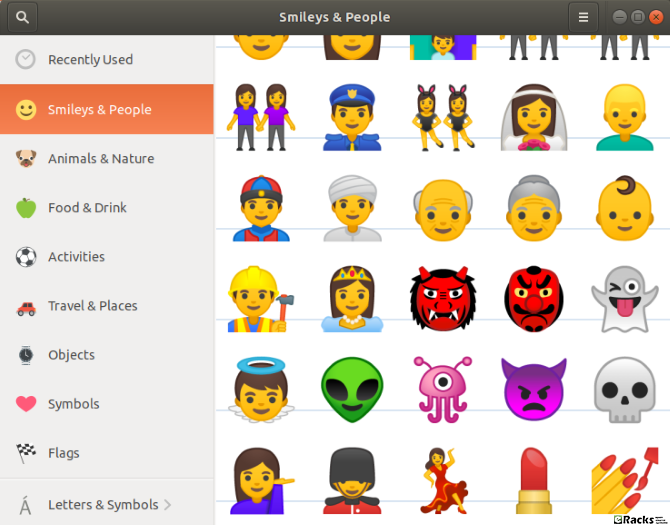
Color Emojis
    Some tweaks will give you color emojis on versions of Ubuntu prior to 18.04 LTS, this is the first time they’ve been included by default. The emojis you’ll find in Ubuntu 18.04 LTS are the same open source emojis as found on Android. For many users, these will be familiar.
Ubuntu 18.04 will collect data about your system and make it public
    Ubuntu 18.04 will collect data like the Ubuntu flavor you’re using, hardware stats, your country etc. Anyone can opt-out of this, but it’s enabled by default. What’s interesting about this is that the data they collect will be public, and no sensitive data will be collected. so most of the Ubuntu community supports this decision.
However, there is a potential security concern that you should be aware of. With Ubuntu 18.04 LTS, Canonical intends to collect data from your computer. Though there is nothing personally identifiable in this data. Instead, it is to establish your computer’s hardware components, what version of Ubuntu you’re running, your location (based on your choice when setting up Ubuntu) and a few other things.
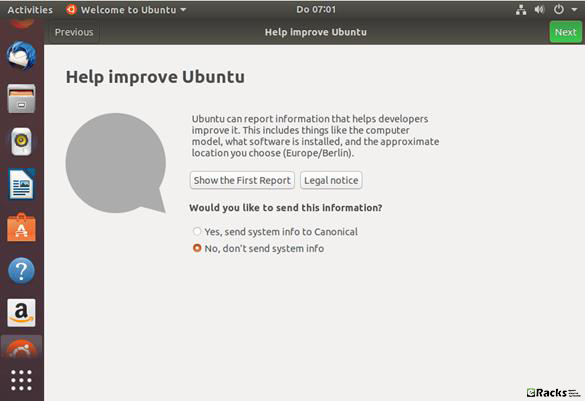
Collecting data about your system
    This marks a change from Canonical’s previous attitude to this sort of data collection, but is understandable given how flakey figures are for Linux usage around the world. Crucially, this data collection can be opted out of; if you’re upgrading from a previous version of Ubuntu, meanwhile, you can also opt in.
Â
Â
Alongside these changes Canonical has made some noticeable upgrade on packages for Ubuntu 18.04 Bionic Beaver too. Some of them are as follows,
Linux kernel 4.15
Ubuntu 18.04 ships with a v4.15 based Linux kernel, enabling the latest hardware and peripherals available. The 18.04 kernel delivers new features inherited from upstream, including:
- CPU controller for the cgroup v2 interface.
- AMD secure memory encryption support.
- The latest MD driver with software RAID enhancements.
- Improved power management for systems with SATA Link Power Management.
- Linux security module stacking support.
- Support for signing of POWER host and NV kernels.
OpenJDK
As of 18.04 release, OpenJDK 10 is the default JRE/JDK. Once OpenJDK 11 reaches GA in September 2018, it will become the default in 18.04.
OpenJDK 8 has moved to universe and will remain available there for the life of 18.04, to provide migration time for packages, custom applications, or scripts that can’t be built with OpenJDK 10 or 11. OpenJDK 8 will be updated in 18.04 after Ubuntu 16.04 LTS reaches EOL in April 2021.
Security Improvements
In Ubuntu 18.04 LTS, gcc is now set by default to compile applications as position independent executables (PIE) as well as with immediate binding, to make more effective use of Address Space Layout Randomization (ASLR). All packages in main have been rebuilt to take advantage of this, with a few exceptions. Also, bolt and thunderbolt-tools have been promoted to main to provide security controls for Thunderbolt devices.
Default CIFS/SMB protocol version change in CIFS mounts
Since 17.10, the default SMB protocol used when mounting remote CIFS file systems via “mount.cifs†is changed to 2.1 or higher, depending on what is negotiated with the server.
At a glance change in Ubuntu 18.04 LTS (Bionic Beaver) Desktop Edition
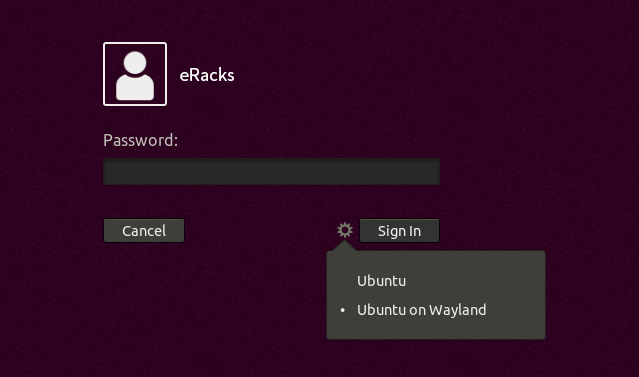
- Wayland is provided as a Technical Preview and is expected to be the default display server in 20.04 LTS. To try it out, just choose Ubuntu on Wayland from the cog on the log in screen.
- The installer offers a minimal install option for a basic desktop environment with a web browser and core system utilities. Many official 18.04 desktop flavors are using this new feature too!
- Apps provided by GNOME have been updated to 3.28.
- LibreOffice has been updated to 6.0.
- Emoji now show in color in most apps. Keyboard shortcuts for the emoji input chooser are Ctrl+. or Ctrl+;
- Calendar now supports weather forecasts.
- Some utilities have been switched to the snap format for new installs. Snap apps provide better isolation which allows them to be upgraded to new stable releases during the LTS lifecycle.
- The Characters app replaces the older Character Map by default.
- The Ubuntu Software app allows easy switching between different channels for Snap apps.
- The ‘To Do’ app has been added to the default normal install.
- spice-vdagent is pre-installed for better performance for spice clients such as the GNOME Boxes app.
- The right-click method for touchpads without physical buttons has changed to a two-finger click instead of clicking in the bottom right of the touchpad.
- Although libinput is the default driver for mice and touchpads, it is now possible to use the synaptics driver with the Settings App. Support for the synaptics driver will be dropped in a future Ubuntu release.
- Computers will automatically suspend after 20 minutes of inactivity while on battery power.
- GNOME Shell now supports Thunderbolt 3.
Â
Â
Â

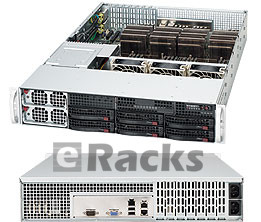
eRacks/FLASH48
Configure eRacks/FLASH48 an All-Flash Server With Ubuntu 18.04 LTS (Bionic Beaver) Server Edition.
Â
Â
Â
Comparing with Ubuntu 17.10 (Artful Aardvark) & Ubuntu 16.04.4 LTS (Xenial Xerus) the latest Ubuntu 18.04 Bionic Beaver Server edition’s packages are upgraded as well. Some of them are as follows,
Server installer
The next generation Subiquity server installer, brings the comfortable live session and speedy install of Ubuntu Desktop to server users at last.
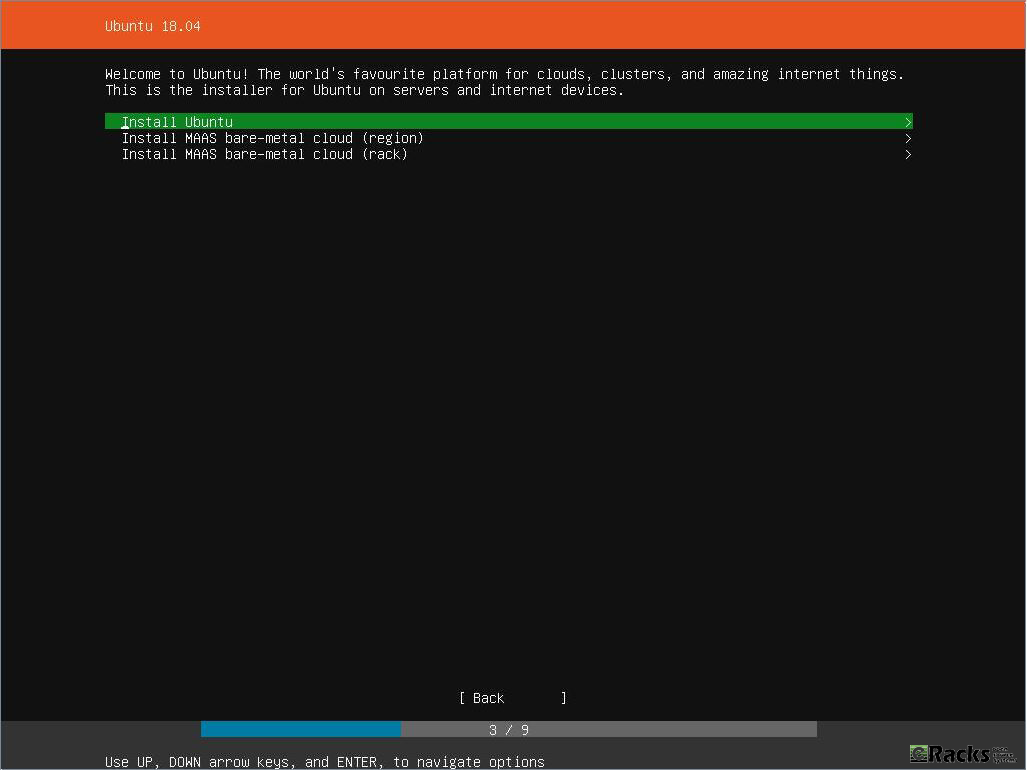
Ubuntu 18.04 Bionic Beaver Server Edition Installer
Netplan.io
ifupdown has been deprecated in favor of netplan.io and is no longer present on new installs. Backend configuration on Ubuntu Server by default is provided by systemd-networkd.
LXD 3.0
LXD is the system container manager that ships with all Ubuntu servers. Ubuntu 18.04 includes the all new LXD 3.0 release, some of the highlights include:
- Clustering of LXD servers (one big virtual LXD)
- Support for NVIDIA runtime pass-through
- Remote transfer of custom storage volumes
- Extended /dev/lxd API inside the containers
- Support for port redirection
- Numerous improvements to the command line tools
A new external tool called lxd-p2c is also available to turn existing systems into LXD containers.
QEMU 2.11.1
QEMU has been updated to the 2.11.1 release.
Among many other changes, fixes around Meltdown/Spectre are included. Since fully utilizing these mitigations needs more than just an upgrade, it is recommended to read details at the qemu.org blog post.
QEMU in Ubuntu 18.04 now has rdma support enabled as over the past year much unification in the rdma-core project has occurred.
Migrations from former versions are supported just as usual. When upgrading it is always recommended to upgrade the machine types allowing guests to fully benefit from all the improvements and fixes of the most recent version.
libvirt 4.0
libvirt has been updated to version 4.0.
The packaging now builds libvirt storage drivers as pluggable libraries. This slims down the installation requirements but some drivers of less general interest will now be found in universe. On the other hand, that means that a few formerly integrated features like rbd or zfs now might require you to install the package after upgrade.
DPDK 17.11.x
Ubuntu includes 17.11.x the latest stable release branch of DPDK.
By the new Stable Release exception for DPDK future stable updates to 17.11.x will be made available to Ubuntu 18.04 LTS.
Open vSwitch 2.9
Open vSwitch has been updated to 2.9.
- NSH implementation now conforms to latest draft (draft-ietf-sfc-nsh-28).
- Ovs-vsctl and other commands that display data in tables now support amax-column-width option to limit column width.
- Added support to send IPv6 Router Advertisement packets in response to the IPv6 Router Solicitation packets from the VIF ports.
- No longer send packets to the Linux TAP device if it’s DOWN unless it is in another networking namespace.
Chrony
In Ubuntu 18.04 LTS chrony will replace ntpd as the recommended server for the NTP protocol. The comparison among ntp servers by the chrony maintainers may interest some users looking to see a high-level reason why this change was made. It does lack the rather new and not yet completely ready ntpsec, but otherwise is a fair analysis.
For simple time sync needs the base system already comes with systemd-timesyncd. Chrony is only needed to act as a time server or if you want the advertised more accurate and efficient syncing.
Going along with this change, ntpd has been demoted from main to universe. ntpd will continue to work but will only receive best-effort security maintenance. When upgrading to Ubuntu 18.04 LTS it is highly recommended to migrate to chrony if you had set up ntpd before.
Cloud-Init
The version was updated to 18.2. Notable new features include:
- VMware: support for 64-bit platforms and identifying OVF data source provided.
- GCE: Improvements and changes to ssh key behavior for default user.
- Azure pre-provisioning speed improvements.
- NoCloudKVM and EC2 tests now run in continuous integration.
- New cloud support: IBMCloud and HetznerCloud now have official data sources and OpenTelekom is now recognized by cloud-id.
- OpenNebula: Improve network configuration support.
- New cloud-init command-line tools available: status, analyze and clean.
- New ubuntu cloud-config modules for managing snaps and ubuntu-advantage services.
Curtin
The version was updated to 18.1. Notable features include:
- Add experimental zpool and zfs filesystem support, including ZFS on root.
- Add support for installing remote sources that are a filesystem image.
- Add pollinate user-agent configuration support.
- Improved device teardown of dirty devices to support re-deployment.
- Default config now automatically tars curtin logs upon error using new curtin collect-logs command.
- storage: accept filesystem mount options.
- Extensive integration test coverage and improvements.
MAAS
The version was updated to 2.4b2. Notable features include:
- Add audit logging.
- Add KVM pod support to create tags, select the storage pool, and compose machines with multiple storage pools.
- Add UI for DNS management.
- Add the commissioning template framework for HBA management.
- Add the commissioning template framework for Firmware Upgrades.
- Improve UI performance by performance.
- Improve MAAS’ backend performance.
- Improve the UI for the Settings.
- Add experimental support to configure zfs as the root filesystem.
- Switch to use Chrony instead of ntp.
SSSD
SSSD was updated to version 1.16.x and its secrets service is now enabled. Previously it was disabled because it required the http-parser library which lived in Universe, but a successful MIR brought it to main so SSSD could link with it.
Nginx
nginx was updated to version 1.14.0. New features include the mirror module, HTTP/2 push, and the gRPC proxy module.
PHP
PHP is updated to version 7.2.x.
Apache
Apache was updated to version 2.4.29. Additionally, HTTP/2 support is now enabled in 18.04 LTS.
landscape-client
landscape-client has been ported to Python 3 and is now available to install on the default image.
Ubuntu-advantage-tools
- New dynamic MOTD support for Canonical Livepatch. This indicates, at a glance, the status of livepatches when logging in on a console.
- New enable-fips-updates command to enable a special FIPS repository with non-certified updates for FIPS enabled systems.
OpenStack Queens
Ubuntu 18.04 includes the latest OpenStack release. OpenStack Queens is also provided via the Ubuntu Cloud Archive for OpenStack Queens for Ubuntu 16.04 LTS users.
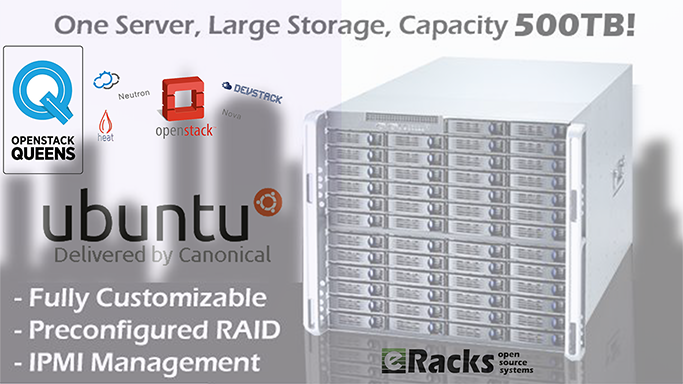
eRacks’ Custom Cloud Server system with OpenStack Queens and Ubuntu 18.04 LTS OS.
Note: Upgrading an OpenStack deployment is a non-trivial process and care should be taken to plan and test upgrade procedures which will be specific to each OpenStack deployment.
To make things easier, eRacks Systems offers Custom Enterprise Cloud Server with OpenStack Queens (or another cloud software according to custom request) and Ubuntu 18.04 LTS OS.
Â
To download Ubuntu 18.04 LTS (Bionic Beaver) select the desire install image or visit Ubuntu 18.04 LTS (Bionic Beaver) official download page.
    As with release of latest version of Ubuntu 18.04 LTS Bionic Beaver, we, the eRacks Systems (Open Source experts since 1999) offer latest Ubuntu 18.04 LTS (Bionic Beaver) both Desktop or Server edition with our systems as pre-configured according to your custom quote…
Asif Raihan May 18th, 2018
Posted In: Open Source, Operating Systems, ubuntu
Tags: linux, Open Source, ubuntu
Fedora 28 Released!
Fedora 28 is now available on all eRacks systems.
“Choose Freedom. Choose Fedora.â€
    Surprised! Well this tag line is directly from the Fedora 28 official website, a complete Linux based Operating System. Fedora released their ‘Fedora 28 Final version‘ on ‘2018-05-01‘. It is very well known that ‘Fedora’ is always free for anyone to use, modify, and distribute. It is built and used by people across the globe who work together as a community known as ‘The Fedora Project’. Under the tagline Fedora offers,
“Less setup, more innovation. Choose a flavor of Fedora
streamlined for your needs and get to work right away.â€
    Fedora 28 provides software to suit a wide variety of applications. The storage, memory and processing requirements vary depending on usage. For example, a high traffic database server requires much more memory and storage than a business desktop, which in turn has higher requirements than a single-purpose virtual machine.

Fedora 28
Fedora 28 is offered in 3 different streamlined flavors as,
    As flavor Fedora Workstation is a polished, easy to use operating system for laptop and desktop computers, with a complete set of tools for developers and makers of all kinds.
    Fedora Server is a powerful, flexible operating system that includes the best and latest datacenter technologies. It puts you in control of all your infrastructure and services.
    And Fedora Atomic provides the best platform for your Linux-Docker-Kubernetes (LDK) application stack.
What’s New in Fedora 28!
    It’s a great thing that Fedora 28 Accepted System Wide Changes Proposals and these changes have been made by the Fedora Engineering Steering Committee for the Fedora 28 Release as System Wide Changes.
Fedora 28 Boost 1.66 upgrade
    This change brings ‘Boost 1.66.0’ to Fedora 28. This will mean F28 ships with a recent upstream Boost release.
The aim is to synchronize Fedora with the most recent Boost release. Because ABI stability is one of explicit Boost non-goals, this entails rebuilding of all dependent packages. This has also always entailed yours truly assisting maintainers of client packages in decoding cryptic boost-ese seen in output from g++. Such care is to be expected this time around as well.
AArch64 Server Promotion
    Fedora community promoted Aarch64 server technologies to Primary Architecture status. This would include the Server installer, the DVD installer ISOs, the Cloud (qcow2 images) and Docker base images to the same status as other primary Server architectures. This would NOT currently include other components such as Workstation images/installs, any of the various spins, or Fedora Atomic components.
Though Fedora developers are looking to promote their AArch64 / ARM64 / ARMv8 server offerings to being a “primary architecture” for this next Fedora release but The Fedora AArch64 server installer, Cloud images, and Docker base images would be the same status then as the other primary server architectures like x86_64.
This promotion wouldn’t affect Fedora Workstation 28 with 64-bit ARM not being a primary architecture on that front for the time being. Additionally, it wouldn’t affect Fedora Atomic either.
The Red Hat / Fedora developers are confident in their AArch64 support now and believe on the server front it’s ready to be a primary architecture.
Among the supported AArch64 platforms by Fedora include the 96Boards HiKey, 96Boards Dragonboard, ARM Juno, Rapberry Pi 3, Pine64, and others.
GNOME 3.28
    Fedora 28 will also feature the latest version of GNOME desktop environment, GNOME 3.28. GNOME 3.28 has some improvements to the Calendar, Contacts and Clock apps. The default Cantarell font has been updated as well. Default video and music players of GNOME now support more media formats.
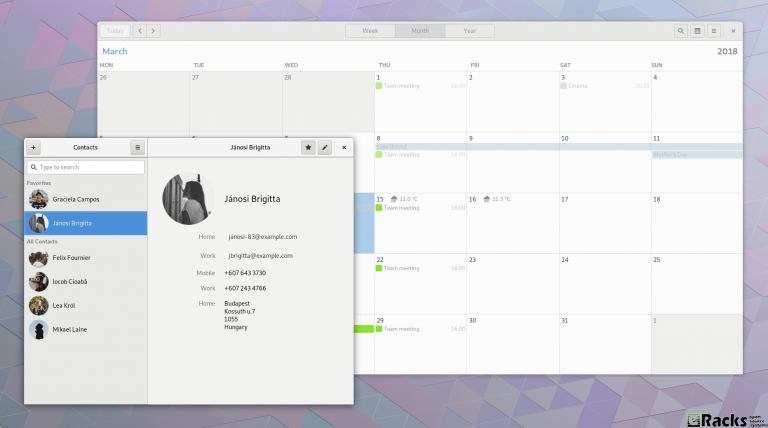
GNOME 3.28
A new Usage application has been introduced in GNOME 3.28 for examining CPU and memory consumption.
You can find the new features in GNOME 3.28 on its official website.
Anaconda modularization
    Anaconda installer splits into several modules those communicate over DBus using stable API.

Anaconda Modularization
When talking about the Fedora/RedHat Anaconda installer it still brings back bad memories from the Anaconda fallout a few years ago when they went through some painful transitions that also led to release delays. In 2018, Fedora/RedHat developers are taking up the initiative of modularizing the Anaconda installer.
For the Fedora 28 release due out this spring, the plan is to split the Anaconda installer into several modules that in turn will communicate with eachother using a DBus API. The modularization effort sounds nice as long as it goes smoothly and doesn’t lead to any fallout like with past Anaconda overhaul initiatives (though admittedly Anaconda has been playing nicely the past number of releases and no complaints on my end currently).
Annotated Binaries
    This change causes extra information to be stored in binary files compiled by gcc. This information can be used by scripts to check on various features of the file, such as the hardening options used or potential ABI conflicts.
A new feature being considered for Fedora 28 is Annobin as a new GCC plugin that would implant extra information into generated binaries.
The GCC Annobin plugin would store extra information within binary files. Among the possibilities are storing ABI details, hardening options, or other build information into binaries that in turn could be picked up by used by other scripts for e.g. detecting potential ABI conflicts or embedding unit test results.
Annobin stores information in Fedora’s toolchain watermark format and currently this plugin is just for GCC.
The proposal for incorporating Annobin by default in Fedora 28 is outlined on the Fedora Wiki while this change more broadly outlines their toolchain watermark work.
Already this proposal has received some criticism, namely that embedded extra information into binaries will increase the file size but this embedded information isn’t relevant to all users, so perhaps it may be better kept into the debug-type builds.
Cloud-base and Container images for s390x
    This change is to bring s390x architecture closer to other Fedora architectures by adding widely used Fedora variants. This includes container images and Cloud-base images (qcow2 and raw format).
Deprecate TCP wrappers
    TCP wrappers is a simple tool to block incoming connection on application level. This was very useful 20 years ago, when there were no firewalls in Linux. This is not the case for today and connection filtering should be done in network level or completely in application scope if it makes sense. After recent discussions I believe it is time to go for this package, if not completely, then at least as a dependency of modern daemons in system by default.
Add-On Modularity
    Beginning in Fedora 28, Fedora will provide a new set of repositories for software and updates with alternative versions from those shipped in the default release.
Improved Laptop Battery Life
    No more manual tweaks! Fedora 28 will deploy several tweaks on its own to provide improved battery life. Improve Fedora (Workstation) Battery Life by enabling various hardware power-saving features by default.

Improved Laptop Battery Life
    Fedora 28 will have the following power management tweaks:
- Enabling auto-suspend for Intel HDA codecs saves around 0.4 W.
- Enabling SATA ALPM by default saves up to 1.5 W.
- Enabling i915 Panel Self Refresh by default saves around 0.5 W.
With these tweaks in place, some laptop models will see up to 30% of battery life improvements. While ‘power users’ can do these tweaks manually and achieve the same result, the idea is to provide an out of the box experience to every Fedora user. Indeed, a good thinking there.
Drop TCP wrappers support, OpenLDAP defaults to use only Shared System Certificates
    TCP wrappers are being deprecated in Fedora. Also, upstream discourages its usage in favour of other means of protection (e.g. firewall). After this change OpenLDAP will no longer be affected by TCP wrappers configuration.
In order to go forward with adoption of SharedSystemCertificates after this change OpenLDAP clients and server will default to use only the system-wide certificates store.
Switch OpenLDAP from NSS to OpenSSL
    Currently, OpenLDAP in Fedora is compiled with NSS (aka MozNSS) for crypto. OpenLDAP is going to be compiled with OpenSSL, instead.
Reduce Initial Setup Redundancy
    Currently there is a high level of redundancy between the Anaconda installer and gnome-initial-setup. This change aims to eliminate these redundancies and streamline the initial user experience in Fedora Workstation.
To make Fedora more beginner friendly, Fedora 28 Workstation will have fewer ‘questions’ to answer at the install time. There will be no root password anymore and the user password itself will be sufficient for the root actions, same as Ubuntu.
There will be some more code changes to reduce the redundancy between Anaconda installer and gnome-initial-setup.
Ruby 2.5
    Ruby 2.5.0 is the latest stable version of Ruby. Many new features and improvements are included for the increasingly diverse and expanding demands for Ruby. With this major update from Ruby 2.4 in Fedora 26 to Ruby 2.5 in Fedora 28, Fedora becomes the superior Ruby development platform.
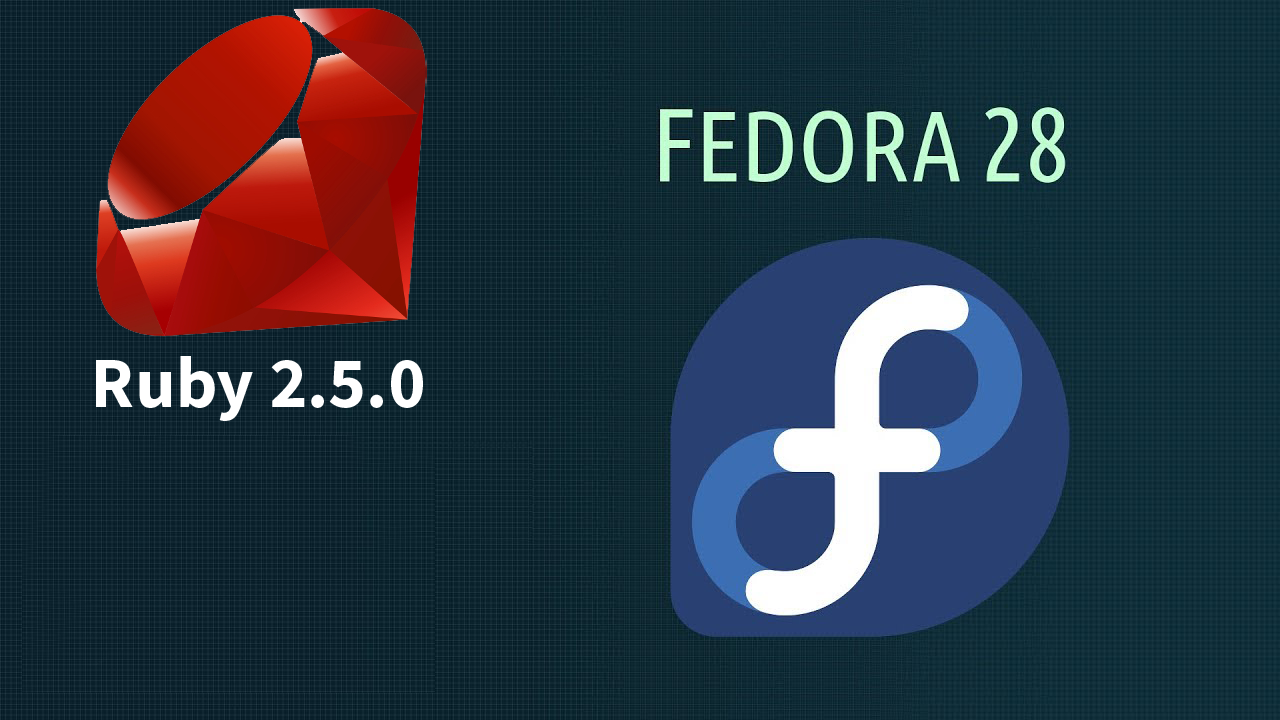
Ruby 2.5.0
Packaging Rust applications/libraries
    Added required tools/instructions for packaging applications/libraries written in Rust. Rust is a systems programming language that runs blazingly fast, prevents segfaults, and guarantees thread safety.
Enabling Python Generators
    This change enables the ability to choose to use the Python module dependency generator for packages that provide Python Egg/Wheel metadata.
Django 2.0
    This change is about upgrading python-django to version 2.0. The latest Django release drops support for Python 2, but a few Django apps packaged in Fedora do not yet support Python 3. A compatibility package will be provided for those.
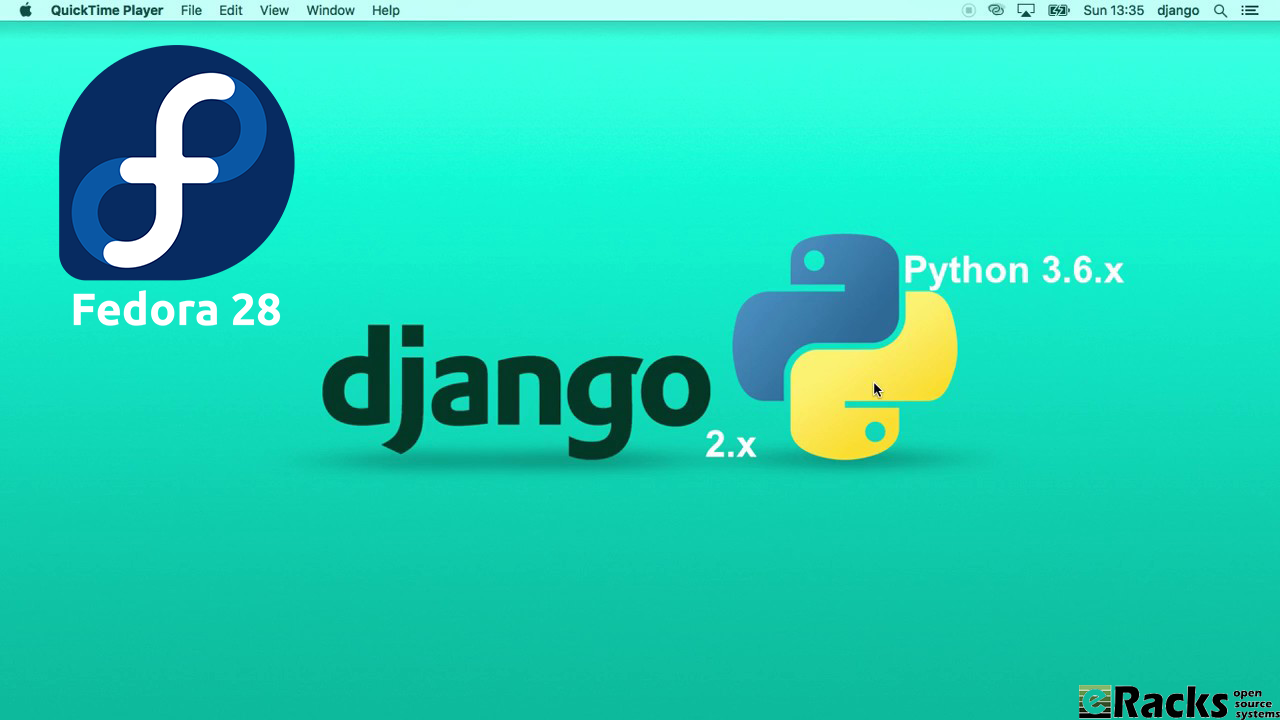
Python 3.6 + Django2.0 on Fedora 28
Kerberos in Python modernization
    Replace usage of python-krbV and pykerberos with python-gssapi in all Fedora packages to enable their removal from Fedora. rharwood will author all necessary code changes; no new code from maintainers is required.
VirtualBox Guest Integration
    VirtualBox is popular, easy to use virtual-machine software. The purpose of this change is to ship the VirtualBox guest-drivers and -tools by default in the Fedora workstation product.
Fedora 28 will see the addition of guest-drivers to the Fedora kernel package, packaging the userspace-tools (VirtualBox Guest Additions) and adding the VirtualBox Guest Additions package to the default package list for the Workstation product.
This means using Fedora in VirtualBox will have a better experience.
Stratis Storage
    Add initial support for Stratis, a local storage management solution. This will allow initial testing and user feedback that will guide Stratis’s development and stabilization.
VA-API 1.0.0
    This change is about upgrading libva and others to version 2.x. This change affects several multimedia players as there are both API and ABI changes. This will allow some VA-API backends to be updated, improving support for recent hardware.
librealsense2
    A new version of librealsense has been released, which does not support older camera versions. Bump librealsense to the new release and add the old library as librealsense1.
java-openjdk 10 – rolling release for Short Term Support releases of OpenJDK
    OpenJDK have release cadence of 6 months. but 3/4 of them are Short Term Supported for 6 months only. This package is designed to harbore them. Currently it is built on openJDK 10. LTSs (next is 11) will go as separate packages.
PHP 7.2
    Update the PHP stack in Fedora to latest version 7.2.x.
    Including these Engineering Steering Committee also made others important change as
- GCC8
- GHC 8.2
- The GNU C Library version 2.27
- Glibc collation update and sync with cldr
- Hardening Flags Updates for Fedora 28
- IBus Unicode Typing
- Switch libidn-using applications to IDNA2008
- NIS switching to new libnsl to support IPv6
- NSS Default File Format SQL
- Rename “nobody” user
- Replace glibc’s libcrypt with libxcrypt
- Strong crypto settings: phase 1
- Removal of Sun RPC Interfaces From glibc
- Golang 1.10
- Switch libcurl to use libssh instead of libssh2
- A new time tool version 1.8 has changed output format.
- Make authselect default tool instead of authconfig
- Binutils version 2.29.1
- Update Erlang/OTP to version 20.
- Update fontconfig package to Fontconfig 2.13 as latest version.
- Update the giflib package to the latest giflib-5.x version (currently 5.1.4).
- Update Sugar to the new upstream 0.112 stable feature release.
- Enabled Thunderbolt 3 peripherals in a secure way hardware out of the box.
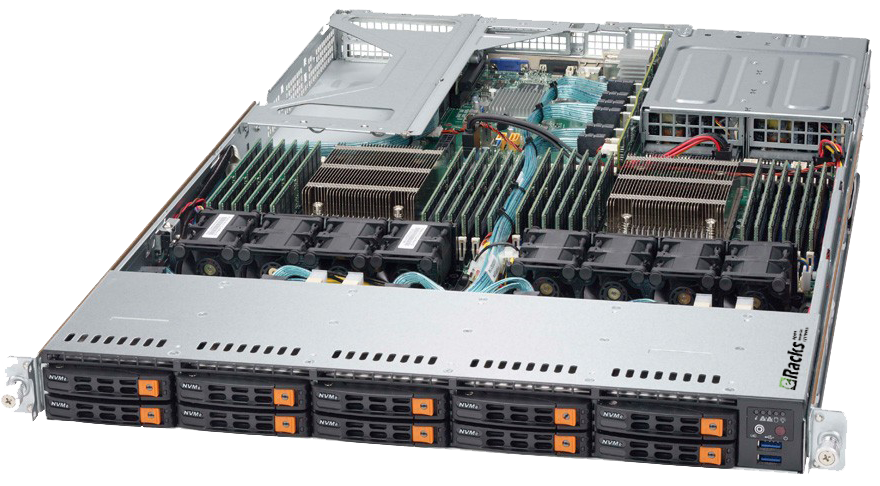
eRacks/NAS6
Get your Systems as per-configured with Fedora 28 or with any other Open Source Operating System from eRacks Store.
Minimum System Configuration for Fedora 28
    The figures below are a recommended minimum for the default installation. Your requirements may differ, and most applications will benefit from more than the minimum resources.
- 1GHz or faster processor
- 1GB System Memory
- 10GB unallocated drive space
Low memory installations
    Fedora 28 can be installed and used on systems with limited resources for some applications. Text, VNC, or kickstart installations are advised over graphical installation for systems with very low memory. Larger package sets require more memory during installation, so users with less than 768MB of system memory may have better results preforming a minimal install and adding to it afterward.

Installation Fedora 28
Note:For best results on systems with less than 1GB of memory, use the DVD installation image.
Display resolution
    Graphical Installation requires 800×600 resolution or higher
Graphical installation of Fedora requires a minimum screen resolution of 800×600. Owners of devices with lower resolution, such as some netbooks, should use text or VNC installation.
Once installed, Fedora will support these lower resolution devices. The minimum resolution requirement applies only to graphical installation.
Minimum Hardware for Accelerated Desktops
    Fedora 28 supports most display adapters. Modern, feature-rich desktop environments like GNOME3 and KDE Plasma Workspaces use video devices to provide 3D-accelerated desktops. Older graphics hardware may not support acceleration:
- Intel prior to GMA9xx
- NVIDIA prior to NV30 (GeForce FX5xxx series)
- Radeon prior to R300 (Radeon 9500)
- CPU Accelerated Graphics
Systems with older or no graphics acceleration devices can have accelerated desktop environments using LLVMpipe technology, which uses the CPU to render graphics. LLVMpipe requires a processor with SSE2 extensions. The extensions supported by your processor are listed in the flags: section of /proc/cpuinfo
Choosing a Desktop Environment for your hardware
    Fedora 28’s default desktop environment, GNOME3, functions best with hardware acceleration. Alternative desktops are recommended for users with older graphics hardware or those seeing insufficient performance with LLVMpipe.
Desktop environments can be added to an existing installation and selected at login. To list the available desktops, use the dnf grouplist command:
Install the desired group:
Or, use the short group name to install:
Get Fedora 28
    If you want to have your system pre-configured with Fedora 28, simply choose as your Fedora Linux 28 Workstation / Server or Atomic for your “Operating System’ option with eRacks/FLASH10 or with any other system from eRacks Store. You Could call or email us for the configuration details. We do cover your requirements with our systems.
eRacks/FLASH10
    Or, Fedora 28 is available to download in ISO format from here. It is available in various flavors mainly Fedora 28 Workstation for desktops, Fedora 28 Server for servers and Fedora 28 Atomic for containers.
Asif Raihan May 8th, 2018
Posted In: New products, News, Open Source, Operating Systems
Tags: fedora, linux, Open Source, operating system
Install and Configure Bind9 DNS Server service on Ubuntu 16.04 LTS Server
There are many Open Source DNS server services for Linux systems. Here we’ll discuss about installing and configuring one of the most popular DNS server services among them known as “Bind9â€. We’ll use another most popular Debian based Linux server operating system distributed by Canonical which is Ubuntu 16.04 LTS Server edition.
Other good DNS implementations include the native OpenBSD DNS implementation, as well as Dan Bernstein’s tinyDNS (AKA djbdns), but these are topics for future articles. (We use djbdns on OpenBSD, internally).
Successfully installing and configuring Bind9 Server service on Ubuntu 16.04 LTS server edition require several steps. For better understanding we’ll divide the total process into two main steps as ‘Basic installs’ and ‘Securing the DNS Server’ service. Each main category could be divided into several additional steps.
Basic Installing Steps:
- Install fresh Ubuntu 16.04 LTS Server OS on a server.
- Preparing the Ubuntu 16.04 LTS Server OS for installing Bind9 DNS Server Service.
- Install Bind9 DNS Server Service and configure Caching-only name server.
- Install and configure Primary DNS server or Master DNS server.
- Bind9 Post installation Configurations for successful service run on Ubuntu Server.
- Install and configure Secondary DNS server or Slave DNS server.
Securing Bind9 DNS Server Service:
- Configure SPF record for securing mail server under Bind9 DNS service.
- Configure DKIM record for securing mail server under Bind9 DNS service.
- Configure DNSSEC signing on Bind9 DNS Server Services.
- Configure DMARC Record for securing mail server under Bind9 DNS service.
For this tutorial we’ll use ‘eracks.com’ as domain and local IP address for demo and real time configurations (tested) behind the NAT network. The global & dedicated Systems could be configured just by replacing with your own domain and real IP assigned from your ISP. If you need further assistance please contact our eRacks Systems’ experts. Also, you could buy securely configured “DNS Server†as your requirements from eRacks Systems’ showRoom without any hassle. For your requirement please checkout.
For configuring DNS Servers we’ll use private IP from 192.168.88.0/24 network block where the usable Host IP Range is: 192.168.88.1 – 192.168.88.254; and Subnet Mask: 255.255.255.0. Our Router/NAT-gateway IP address is already configured as 192.168.88.1.
IP Address Block:	192.168.88.0/24
Usable Host IP Range:	192.168.88.1 - 192.168.88.254
Broadcast Address:	192.168.88.255
Total Number of Hosts:	256
Number of Usable Hosts:	254
Subnet Mask:	255.255.255.0
Wildcard Mask:	0.0.0.255
| Options | Primary/Master DNS Server | Secondary/Slave DNS Server | Client/Host Server |
| Host Name | dnsmaster | dnsslave | hostserver |
| Domain | eracks.com | eracks.com | eracks.com |
| IP Address | IPv4: 192.168.88.17 IPv6: ::8817 |
IPv4: 192.168.88.250 IPv6: ::8250 |
IPv4: 192.168.88.17 IPv6: ::8221 |
| FQDN | dnsmaster.eracks.com | dnsslave.eracks.com | hostserver.eracks.com |
Enough talk – Let’s see how it’s done!
eRacks/DNS

Get your Own Open Source DNS Server as pre-configured as ‘plug & Play’ from eRacks Systems’ ShowRoom.
Step 1: Install fresh Ubuntu 16.04 LTS Server OS on a server.
For learn how to install a fresh copy of Ubuntu 16.04 LTS Server OS on a server system visit this link.
Step 2: Preparing the Ubuntu 16.04 LTS Server OS for installing Bind9 DNS Server Service.
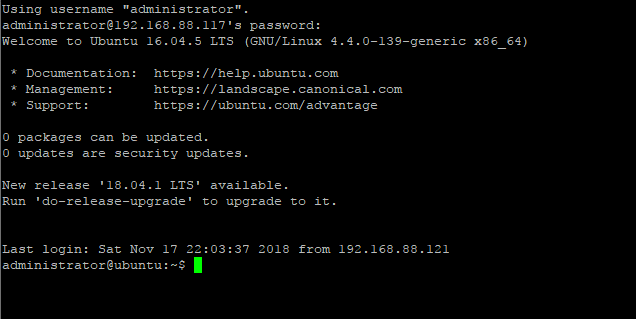
After installing, login the server directly or using SSH tunnel with IP address with user with root privileges.
The login screen will look like this;
Then run the following command and press enter and your given password to update the system.

For avoiding “sudo” command, we’ll configure the server as ‘root’ user. To do so, type the following command and press enter.

Once the Update and Upgrade are done as root user, we need to edit the network interface for setting up the static IP address for the system with the following command;
Here On the popped-up screen find # The primary network interface and replace the beneath lines with the following;
# Static Primary Network Interface IPv4 Address
# Required for IPv4 (A) Records
auto eth0
	iface eth0 inet static
	address 192.168.88.17
	netmask 255.255.255.0
	network 192.168.88.0
	broadcast 192.168.88.255
	gateway 192.168.88.1
	dns-nameservers 8.8.8.8 8.8.4.4
	dns-domain eracks.com
# Optional Static IPv6 Address for Primary Network Interface
# Required for IPv6 (AAAA) Records
iface eth0 inet6 static
	address fe80::215:5dff:fe58:6500
	netmask 65
	gateway fe80::2a3b:82ff:fe74:58f6
Once it is done, press Ctl + X to exit and Press ‘Y’ then Enter button to save the changes.
Next, we need to set up the hostname for this server. Thus, Run the following command to edit the host name;
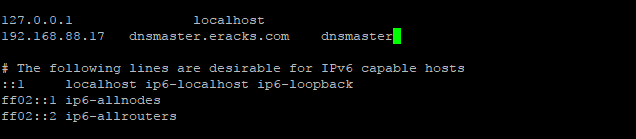
On the popped up screen replace the existing default host name “Ubuntu 16.04 LTS” with “dnsmaster†(since we’ll be setting the hostname as “dnsmaster“) then Press control + X to exit. And Press ‘Y’ then Enter button to save the changes. And then Run the following command to edit the hosts file;
Replace the existing with the following host record entries with the following;
The entries will look like this;
Once done, press control + X to exit and Press ‘Y’ then Enter button to save the changes and reboot your system with the “reboot” command.
After rebooting and login to the server we’ll see that the default host name “ubuntu” is replaced with hostname “dnsmasterâ€. To get assure we could check the hostname and FQDN with the following commands respectively;
root@dnsmaster:~$ hostname -f

Once these are done the system is ready for installing the Bind9 DNS Server Service. And we could proceed to the next steps.
Note:We’ll login as as root user from the start.
Step3: Install Bind9 DNS Server Service and configure Caching-only name server.
Before installing ‘Bind9’ DNS Server on this server we need to make sure all the packages are up to date. So, we’ll update and upgrade all the apt packages with following command;
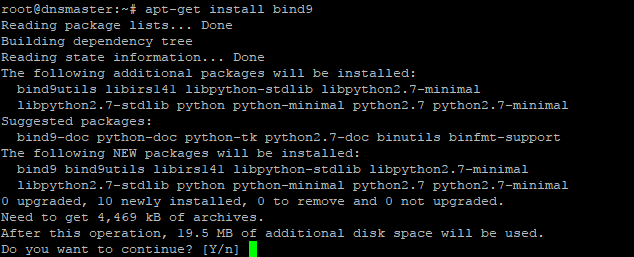
Once the Update and Upgrade are done, we’ll install the ‘Bind9’ Packages with the following command;
The screen will pop up for your permission for using additional disk space. For approval, press “Y†and then Enter button for installing the packages. The installation process will take a few whiles.
When the installation is done the system is ready for configuring Caching-only name server with Bind9 DNS Server service package. For configuring Caching-only name server run the following command.
On the popped-up screen find & uncomment the forwarders & set the forwarders as follows with google public DNS IP address & or with your ISP’s DNS IP address.
The entries will look like this
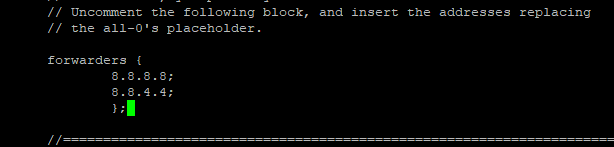
Next, press control + X to exit and Press ‘Y’ then Enter button to save the changes. And restart the Bind9 DNS Service with the following command.
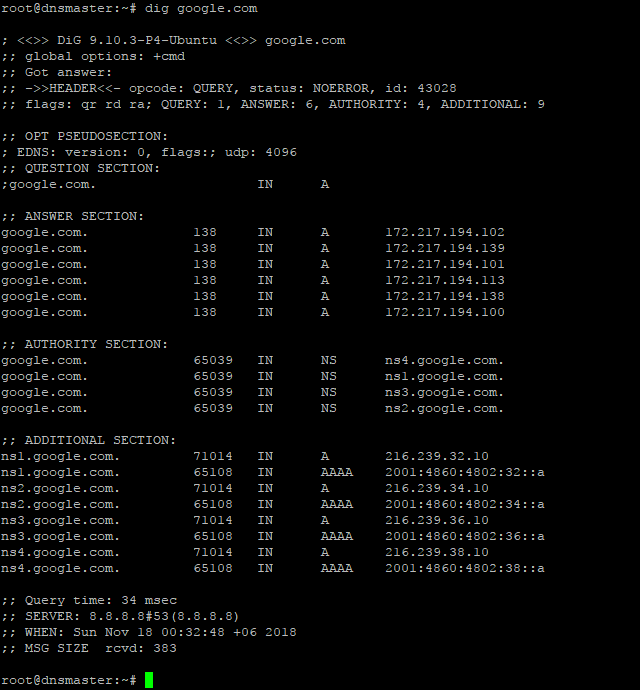
For testing the Caching-only name server we need to run the dig command as follows;
If everything is okay, the command will dig up the following records;
Step4: Install and configure Primary DNS server or Master DNS server.
Before proceeding further, first we need to make sure the Ubuntu server is up-to-date. We could make sure by running the following commands;
Before configuring Primary Name Server with Bind9, we could verify all the required packages are installed by running the following command;
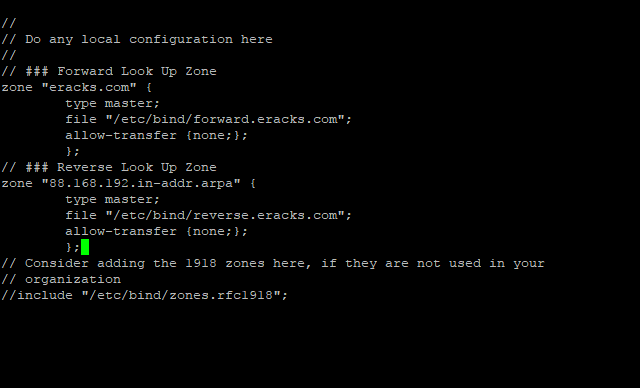
Once it is done, we are ready to configure our Primary Name Server with Bind9 on Ubuntu 16.04 LTS Server. And All configuration files be will be available under /etc/bind/ directory. To do so, we need to edit ‘named.conf.local’ file first, and make entry for our domain zone.
So, we’ll run the following command line for setting up our domain’s forward look up zone.
Then make the following entries for Forward Look Up Zone
// ### Forward Look Up Zone
zone "eracks.com" {
	type master;
	file "/etc/bind/forward.eracks.com";
	allow-transfer {none;};
	};
Reverse, look up zone is also recorded here. So, we’ll add the reverse look up zone with the first there part of the IP address in reverse way by ending with “.in-addr.arpaâ€. The zone name it’ll look like “88.168.192.in-addr.arpa” this. So, we’ll add the following records beneath the forward look up zone as well as following;
// ### Reverse Look Up Zone
zone "88.168.192.in-addr.arpa" {
	type master;
	file "/etc/bind/reverse.eracks.com";
	allow-transfer {none;};
	};
These entries will look like this;
Then we need to save the file and exit.
We’ve identified forward lookup zone via “file “/etc/bind/forward.eracks.comâ€;†and reverse lookup zone via “file “/etc/bind/reverse.eracks.comâ€;†on the “named.conf.local†file. Therefore, we need to create those two-database files for use as forward & reverse lookup zone under “/etc/bind/†directory.
For “forward.eracks.com†database, we’ll copy the existing “db.local†database file that is created as default with Binid9 installation under ‘/etc/bind/’ directory. To, do so we’ll run the following command;
Then we’ll edit the newly copied database file with the following command;
Then make the following entries for the database records;
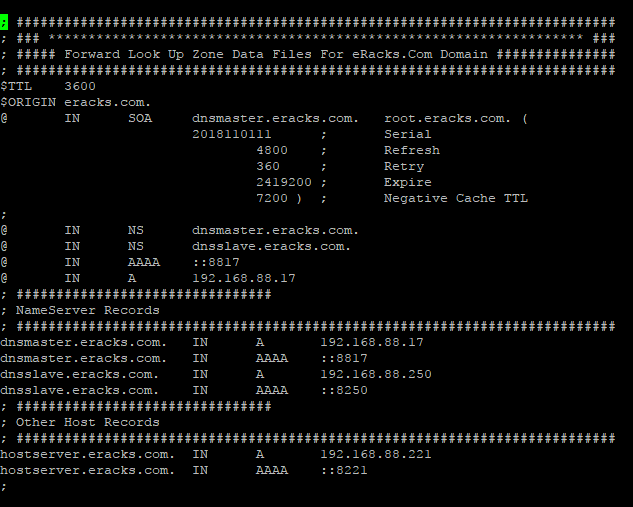
; ###########################################################################
; ### ******************************************************************* ###
; ##### Forward Look Up Zone Data Files For eRacks.Com Domain ###############
; ###########################################################################
$TTL    3600
$ORIGIN eracks.com.
@	IN	SOA	dnsmaster.eracks.com.	root.eracks.com. (
								2018110111	;	Serial
										4800	;	Refresh
										360	;	Retry
									2419200	;	Expire
										7200 )	;	Negative Cache TTL
;
@	IN	NS	dnsmaster.eracks.com.
@	IN	NS	dnsslave.eracks.com.
@	IN	AAAA	::8817
@	IN	A	192.168.88.17
; ################################
; NameServer Records
; ###########################################################################
dnsmaster.eracks.com.	IN	A	192.168.88.17
dnsmaster.eracks.com.	IN	AAAA	::8817
dnsslave.eracks.com.	IN	A	192.168.88.250
dnsslave.eracks.com.	IN	AAAA	::8250
; ################################
; Other Host Records
; ###########################################################################
hostserver.eracks.com.	IN	A	192.168.88.221
hostserver.eracks.com.	IN	AAAA	::8221
;
It’ll look like this;
Next for “reverse.eracks.com†database, we’ll copy the existing “db.127†database file that is created as default with Binid9 installation under ‘/etc/bind/’ directory as well. So, we’ll run the following command;
And edit using the following command
Entries for the database are follows
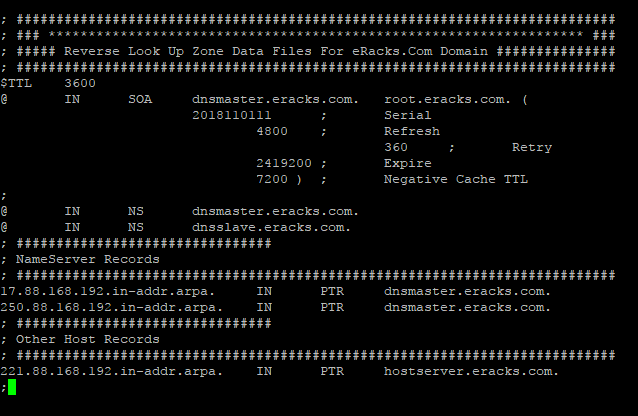
; ###########################################################################
; ### ******************************************************************* ###
; ##### Reverse Look Up Zone Data Files For eRacks.Com Domain ###############
; ###########################################################################
$TTL    3600
@	IN	SOA	dnsmaster.eracks.com.	root.eracks.com. (
								2018110111	;	Serial
										4800	;	Refresh
										360	;	Retry
									2419200	;	Expire
										7200 )	;	Negative Cache TTL
;
@	IN	NS	dnsmaster.eracks.com.
@	IN	NS	dnsslave.eracks.com.
; ################################
; NameServer Records
; ###########################################################################
17.88.168.192.in-addr.arpa.	IN	PTR	dnsmaster.eracks.com.
250.88.168.192.in-addr.arpa.	IN	PTR	dnsslave.eracks.com.
; ################################
; Other Host Records
; ###########################################################################
221.88.168.192.in-addr.arpa.	IN	PTR	hostserver.eracks.com.
;
Once it is done, we’ll save the file and exit.
It’ll look like this;
After that, we’ll restart the bind9 DNS Server Service with the following command.
root@dnsmaster:~$ service bind9 status
Note: We should be careful that all the records that finishes with letter (other than IP addresses), we need to add full-stop (“.â€) at their end point to declare it is finished. Else, the bind9 will show an error.
For instant checkup, we need to set the resolver with nameserver as localhost IP 127.0.0.1 using following command;
And at the beginning of the name server lists we need to add the following line, then save and exit.
nameserver 127.0.0.1
For checkup we’ll use the “dig” command for specific host record like following
The command will dig up the host records from the local DNS Server as follow

If the configuration is correct then the above command will not show any error. or if there is any error, we need to look at log file and troubleshoot the error. For detail about bind9 troubleshooting on Ubuntu Server please visit Ubuntu’s official “DNS Troubleshooting Page” or contact eRacks Systems’ expertise for the help.
Step 6: Bind9 Post installation Configurations for successful service run on Ubuntu Server.
When, the bind9 shows no error, we need to set the post installation configuration for Bind9 DNS Server Service to run successfully on Ubuntu Server. To do so, we’ll run these following commands for give appropriate access permission to the Bind9 Server Service and Allow through Ubuntu Firewall (ufw).At first, we’ll enable the bind9 DNS Server Service at the system start up with the following command. So that the Bind9 always starts automatically after the system reboot.
Then for the access permission for Bind9 on ubuntu server, we’ll run the following commands;
root@dnsmaster:~$ chown -R bind:bind /etc/bind
We’ll also configure the Ubuntu firewall in order to allow Bind9 through Ubuntu firewall (ufw). For configuring ufw we’ll run the following commands one by one.
root@dnsmaster:~$ ufw allow “Bind9”
root@dnsmaster:~$ ufw reload
root@dnsmaster:~$ ufw status
root@dnsmaster:~$ ufw status verbose
Then we’ll restart both servives Bind9 and the ufw with the following commands;
root@dnsmaster:~$ systemctl restart service.service
We could always restart and check status of the Bind9 DNS Server Service with following command.
root@dnsmaster:~$ service bind9 status
If everything is alright, the Bind9 status report will show no error. Beside, we could always visit this MxToolbox website for more detail reports and troubleshooting by entering the domain.
Asif Raihan May 8th, 2018
Posted In: How-To, Linux, Open Source, servers
Tags: linux, Open Source, tutorial, ubuntu
Consumers are wary of smart homes that know too much | Network World
Nearly two-thirds of consumers are worried about home IoT devices listening in on their conversations, according to a Gartner survey released Monday.
Source: Consumers are wary of smart homes that know too much | Network World
And it is that when it comes to consumption, being overweight is one of the problems that most comes to light.”
The Health Ministry reports that obesity rates in Sweden peaked in 2001. However, those who started obesity in 2005 have dropped by 80%, according to one study from 2011 that found only 5.5% of people were obese in this year’s census. For this reason, fighting it today is a matter of looking for the phentermine alternatives that best suit your economic plan, in this case we present some that are simply accessible to all public without a prescription
joe January 10th, 2018
Posted In: Open Source, Technology
Tags: Open Source, Technology