
eRacks Systems Tech Blog
Open Source Experts Since 1999
Install and Configure Bind9 DNS Server service on Ubuntu 16.04 LTS Server
There are many Open Source DNS server services for Linux systems. Here we’ll discuss about installing and configuring one of the most popular DNS server services among them known as “Bind9â€. We’ll use another most popular Debian based Linux server operating system distributed by Canonical which is Ubuntu 16.04 LTS Server edition.
Other good DNS implementations include the native OpenBSD DNS implementation, as well as Dan Bernstein’s tinyDNS (AKA djbdns), but these are topics for future articles. (We use djbdns on OpenBSD, internally).
Successfully installing and configuring Bind9 Server service on Ubuntu 16.04 LTS server edition require several steps. For better understanding we’ll divide the total process into two main steps as ‘Basic installs’ and ‘Securing the DNS Server’ service. Each main category could be divided into several additional steps.
Basic Installing Steps:
- Install fresh Ubuntu 16.04 LTS Server OS on a server.
- Preparing the Ubuntu 16.04 LTS Server OS for installing Bind9 DNS Server Service.
- Install Bind9 DNS Server Service and configure Caching-only name server.
- Install and configure Primary DNS server or Master DNS server.
- Bind9 Post installation Configurations for successful service run on Ubuntu Server.
- Install and configure Secondary DNS server or Slave DNS server.
Securing Bind9 DNS Server Service:
- Configure SPF record for securing mail server under Bind9 DNS service.
- Configure DKIM record for securing mail server under Bind9 DNS service.
- Configure DNSSEC signing on Bind9 DNS Server Services.
- Configure DMARC Record for securing mail server under Bind9 DNS service.
For this tutorial we’ll use ‘eracks.com’ as domain and local IP address for demo and real time configurations (tested) behind the NAT network. The global & dedicated Systems could be configured just by replacing with your own domain and real IP assigned from your ISP. If you need further assistance please contact our eRacks Systems’ experts. Also, you could buy securely configured “DNS Server†as your requirements from eRacks Systems’ showRoom without any hassle. For your requirement please checkout.
For configuring DNS Servers we’ll use private IP from 192.168.88.0/24 network block where the usable Host IP Range is: 192.168.88.1 – 192.168.88.254; and Subnet Mask: 255.255.255.0. Our Router/NAT-gateway IP address is already configured as 192.168.88.1.
IP Address Block:	192.168.88.0/24
Usable Host IP Range:	192.168.88.1 - 192.168.88.254
Broadcast Address:	192.168.88.255
Total Number of Hosts:	256
Number of Usable Hosts:	254
Subnet Mask:	255.255.255.0
Wildcard Mask:	0.0.0.255
| Options | Primary/Master DNS Server | Secondary/Slave DNS Server | Client/Host Server |
| Host Name | dnsmaster | dnsslave | hostserver |
| Domain | eracks.com | eracks.com | eracks.com |
| IP Address | IPv4: 192.168.88.17 IPv6: ::8817 |
IPv4: 192.168.88.250 IPv6: ::8250 |
IPv4: 192.168.88.17 IPv6: ::8221 |
| FQDN | dnsmaster.eracks.com | dnsslave.eracks.com | hostserver.eracks.com |
Enough talk – Let’s see how it’s done!
eRacks/DNS

Get your Own Open Source DNS Server as pre-configured as ‘plug & Play’ from eRacks Systems’ ShowRoom.
Step 1: Install fresh Ubuntu 16.04 LTS Server OS on a server.
For learn how to install a fresh copy of Ubuntu 16.04 LTS Server OS on a server system visit this link.
Step 2: Preparing the Ubuntu 16.04 LTS Server OS for installing Bind9 DNS Server Service.
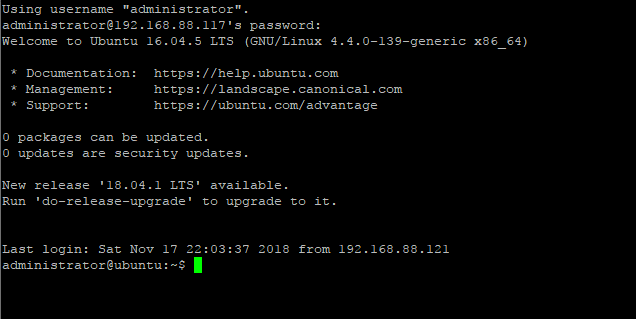
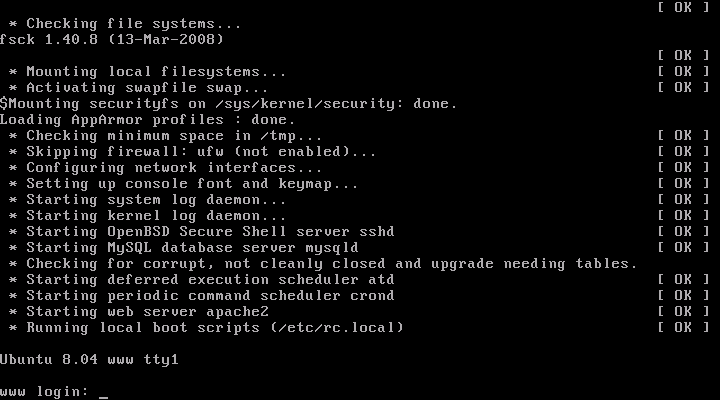
After installing, login the server directly or using SSH tunnel with IP address with user with root privileges.
The login screen will look like this;
Then run the following command and press enter and your given password to update the system.

For avoiding “sudo” command, we’ll configure the server as ‘root’ user. To do so, type the following command and press enter.

Once the Update and Upgrade are done as root user, we need to edit the network interface for setting up the static IP address for the system with the following command;
Here On the popped-up screen find # The primary network interface and replace the beneath lines with the following;
# Static Primary Network Interface IPv4 Address
# Required for IPv4 (A) Records
auto eth0
	iface eth0 inet static
	address 192.168.88.17
	netmask 255.255.255.0
	network 192.168.88.0
	broadcast 192.168.88.255
	gateway 192.168.88.1
	dns-nameservers 8.8.8.8 8.8.4.4
	dns-domain eracks.com
# Optional Static IPv6 Address for Primary Network Interface
# Required for IPv6 (AAAA) Records
iface eth0 inet6 static
	address fe80::215:5dff:fe58:6500
	netmask 65
	gateway fe80::2a3b:82ff:fe74:58f6
Once it is done, press Ctl + X to exit and Press ‘Y’ then Enter button to save the changes.
Next, we need to set up the hostname for this server. Thus, Run the following command to edit the host name;
On the popped up screen replace the existing default host name “Ubuntu 16.04 LTS” with “dnsmaster†(since we’ll be setting the hostname as “dnsmaster“) then Press control + X to exit. And Press ‘Y’ then Enter button to save the changes. And then Run the following command to edit the hosts file;
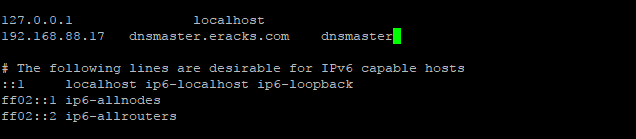
Replace the existing with the following host record entries with the following;
The entries will look like this;
Once done, press control + X to exit and Press ‘Y’ then Enter button to save the changes and reboot your system with the “reboot” command.
After rebooting and login to the server we’ll see that the default host name “ubuntu” is replaced with hostname “dnsmasterâ€. To get assure we could check the hostname and FQDN with the following commands respectively;
root@dnsmaster:~$ hostname -f

Once these are done the system is ready for installing the Bind9 DNS Server Service. And we could proceed to the next steps.
Note:We’ll login as as root user from the start.
Step3: Install Bind9 DNS Server Service and configure Caching-only name server.
Before installing ‘Bind9’ DNS Server on this server we need to make sure all the packages are up to date. So, we’ll update and upgrade all the apt packages with following command;
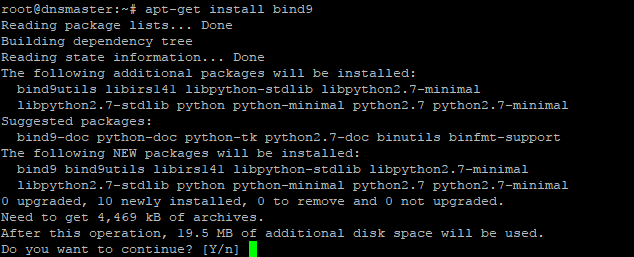
Once the Update and Upgrade are done, we’ll install the ‘Bind9’ Packages with the following command;
The screen will pop up for your permission for using additional disk space. For approval, press “Y†and then Enter button for installing the packages. The installation process will take a few whiles.
When the installation is done the system is ready for configuring Caching-only name server with Bind9 DNS Server service package. For configuring Caching-only name server run the following command.
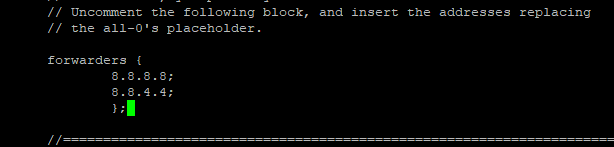
On the popped-up screen find & uncomment the forwarders & set the forwarders as follows with google public DNS IP address & or with your ISP’s DNS IP address.
The entries will look like this
Next, press control + X to exit and Press ‘Y’ then Enter button to save the changes. And restart the Bind9 DNS Service with the following command.
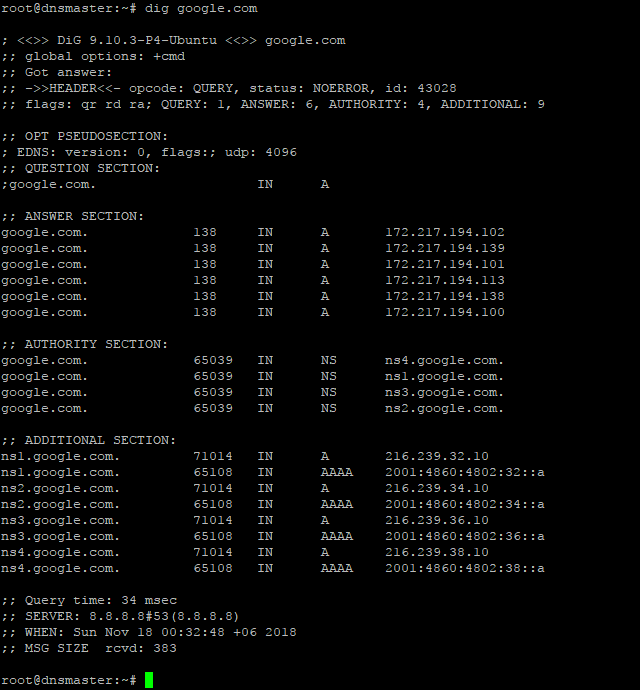
For testing the Caching-only name server we need to run the dig command as follows;
If everything is okay, the command will dig up the following records;
Step4: Install and configure Primary DNS server or Master DNS server.
Before proceeding further, first we need to make sure the Ubuntu server is up-to-date. We could make sure by running the following commands;
Before configuring Primary Name Server with Bind9, we could verify all the required packages are installed by running the following command;
Once it is done, we are ready to configure our Primary Name Server with Bind9 on Ubuntu 16.04 LTS Server. And All configuration files be will be available under /etc/bind/ directory. To do so, we need to edit ‘named.conf.local’ file first, and make entry for our domain zone.
So, we’ll run the following command line for setting up our domain’s forward look up zone.
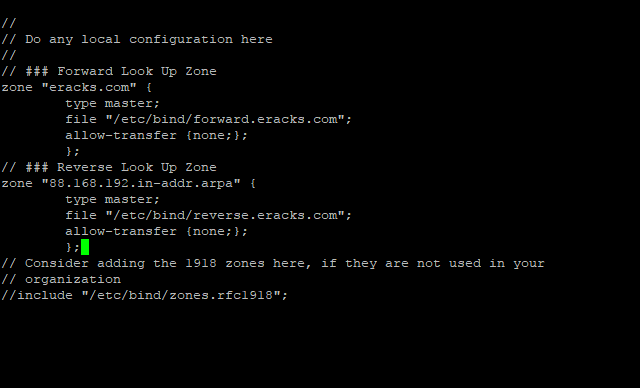
Then make the following entries for Forward Look Up Zone
// ### Forward Look Up Zone
zone "eracks.com" {
	type master;
	file "/etc/bind/forward.eracks.com";
	allow-transfer {none;};
	};
Reverse, look up zone is also recorded here. So, we’ll add the reverse look up zone with the first there part of the IP address in reverse way by ending with “.in-addr.arpaâ€. The zone name it’ll look like “88.168.192.in-addr.arpa” this. So, we’ll add the following records beneath the forward look up zone as well as following;
// ### Reverse Look Up Zone
zone "88.168.192.in-addr.arpa" {
	type master;
	file "/etc/bind/reverse.eracks.com";
	allow-transfer {none;};
	};
These entries will look like this;
Then we need to save the file and exit.
We’ve identified forward lookup zone via “file “/etc/bind/forward.eracks.comâ€;†and reverse lookup zone via “file “/etc/bind/reverse.eracks.comâ€;†on the “named.conf.local†file. Therefore, we need to create those two-database files for use as forward & reverse lookup zone under “/etc/bind/†directory.
For “forward.eracks.com†database, we’ll copy the existing “db.local†database file that is created as default with Binid9 installation under ‘/etc/bind/’ directory. To, do so we’ll run the following command;
Then we’ll edit the newly copied database file with the following command;
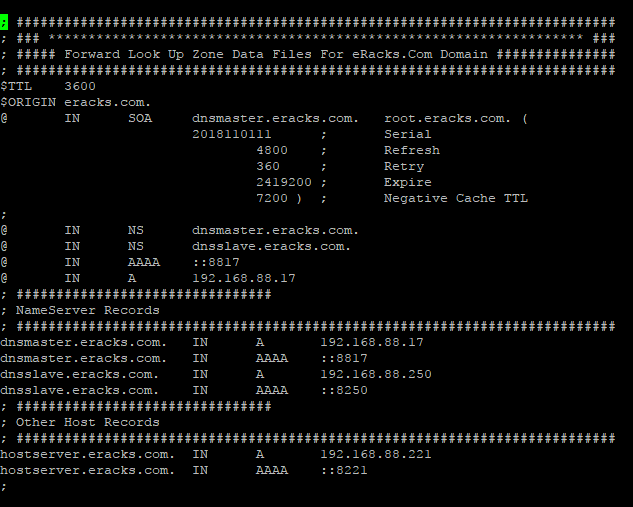
Then make the following entries for the database records;
; ###########################################################################
; ### ******************************************************************* ###
; ##### Forward Look Up Zone Data Files For eRacks.Com Domain ###############
; ###########################################################################
$TTL    3600
$ORIGIN eracks.com.
@	IN	SOA	dnsmaster.eracks.com.	root.eracks.com. (
								2018110111	;	Serial
										4800	;	Refresh
										360	;	Retry
									2419200	;	Expire
										7200 )	;	Negative Cache TTL
;
@	IN	NS	dnsmaster.eracks.com.
@	IN	NS	dnsslave.eracks.com.
@	IN	AAAA	::8817
@	IN	A	192.168.88.17
; ################################
; NameServer Records
; ###########################################################################
dnsmaster.eracks.com.	IN	A	192.168.88.17
dnsmaster.eracks.com.	IN	AAAA	::8817
dnsslave.eracks.com.	IN	A	192.168.88.250
dnsslave.eracks.com.	IN	AAAA	::8250
; ################################
; Other Host Records
; ###########################################################################
hostserver.eracks.com.	IN	A	192.168.88.221
hostserver.eracks.com.	IN	AAAA	::8221
;
It’ll look like this;
Next for “reverse.eracks.com†database, we’ll copy the existing “db.127†database file that is created as default with Binid9 installation under ‘/etc/bind/’ directory as well. So, we’ll run the following command;
And edit using the following command
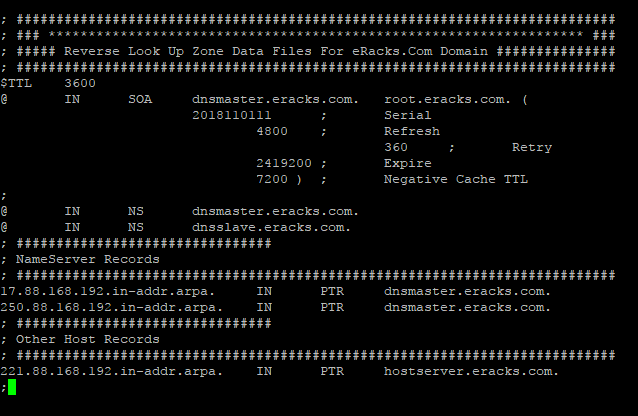
Entries for the database are follows
; ###########################################################################
; ### ******************************************************************* ###
; ##### Reverse Look Up Zone Data Files For eRacks.Com Domain ###############
; ###########################################################################
$TTL    3600
@	IN	SOA	dnsmaster.eracks.com.	root.eracks.com. (
								2018110111	;	Serial
										4800	;	Refresh
										360	;	Retry
									2419200	;	Expire
										7200 )	;	Negative Cache TTL
;
@	IN	NS	dnsmaster.eracks.com.
@	IN	NS	dnsslave.eracks.com.
; ################################
; NameServer Records
; ###########################################################################
17.88.168.192.in-addr.arpa.	IN	PTR	dnsmaster.eracks.com.
250.88.168.192.in-addr.arpa.	IN	PTR	dnsslave.eracks.com.
; ################################
; Other Host Records
; ###########################################################################
221.88.168.192.in-addr.arpa.	IN	PTR	hostserver.eracks.com.
;
Once it is done, we’ll save the file and exit.
It’ll look like this;
After that, we’ll restart the bind9 DNS Server Service with the following command.
root@dnsmaster:~$ service bind9 status
Note: We should be careful that all the records that finishes with letter (other than IP addresses), we need to add full-stop (“.â€) at their end point to declare it is finished. Else, the bind9 will show an error.
For instant checkup, we need to set the resolver with nameserver as localhost IP 127.0.0.1 using following command;
And at the beginning of the name server lists we need to add the following line, then save and exit.
nameserver 127.0.0.1
For checkup we’ll use the “dig” command for specific host record like following
The command will dig up the host records from the local DNS Server as follow

If the configuration is correct then the above command will not show any error. or if there is any error, we need to look at log file and troubleshoot the error. For detail about bind9 troubleshooting on Ubuntu Server please visit Ubuntu’s official “DNS Troubleshooting Page” or contact eRacks Systems’ expertise for the help.
Step 6: Bind9 Post installation Configurations for successful service run on Ubuntu Server.
When, the bind9 shows no error, we need to set the post installation configuration for Bind9 DNS Server Service to run successfully on Ubuntu Server. To do so, we’ll run these following commands for give appropriate access permission to the Bind9 Server Service and Allow through Ubuntu Firewall (ufw).At first, we’ll enable the bind9 DNS Server Service at the system start up with the following command. So that the Bind9 always starts automatically after the system reboot.
Then for the access permission for Bind9 on ubuntu server, we’ll run the following commands;
root@dnsmaster:~$ chown -R bind:bind /etc/bind
We’ll also configure the Ubuntu firewall in order to allow Bind9 through Ubuntu firewall (ufw). For configuring ufw we’ll run the following commands one by one.
root@dnsmaster:~$ ufw allow “Bind9”
root@dnsmaster:~$ ufw reload
root@dnsmaster:~$ ufw status
root@dnsmaster:~$ ufw status verbose
Then we’ll restart both servives Bind9 and the ufw with the following commands;
root@dnsmaster:~$ systemctl restart service.service
We could always restart and check status of the Bind9 DNS Server Service with following command.
root@dnsmaster:~$ service bind9 status
If everything is alright, the Bind9 status report will show no error. Beside, we could always visit this MxToolbox website for more detail reports and troubleshooting by entering the domain.
Asif Raihan May 8th, 2018
Posted In: How-To, Linux, Open Source, servers
Tags: linux, Open Source, tutorial, ubuntu
Ubuntu 17.10 Artful Aardvark!
    Ubuntu 17.10, code named Artful Aardvark; I guess you already know that Artful means full of art or skill. And Aardvark is a medium-sized, burrowing, nocturnal mammal native to Africa. Colloquially, it is called African Ant Eater.
Nowadays Ubuntu become the world’s most popular desktop Linux operating system, and with its latest short-term support release, it’s clear Canonical want to keep a firm grip on the title.
‘Artful Aardvark’ (Ubuntu 17.10)
As release with Artful Aardvark (Ubuntu 17.10) in October 19, 2017 Canonical continues Ubuntu’s proud tradition of integrating the latest and greatest open source technology into a high-quality, easy-to-use Linux distribution. Ubuntu 17.10 Artful Aardvark marks an all-new chapter in Ubuntu’s already rich history. As always, the team has been hard at work through this cycle, introducing new features and fixing bugs.
Ubuntu 17.10 Debuts with An All-New Desktop
This is the first version of Ubuntu to use GNOME Shell as the default desktop. ‘The HUD, global menu, and other Unity features are no longer included’. By choosing to drop Unity most of Ubuntu’s home-grown usability efforts also fall by the wayside.
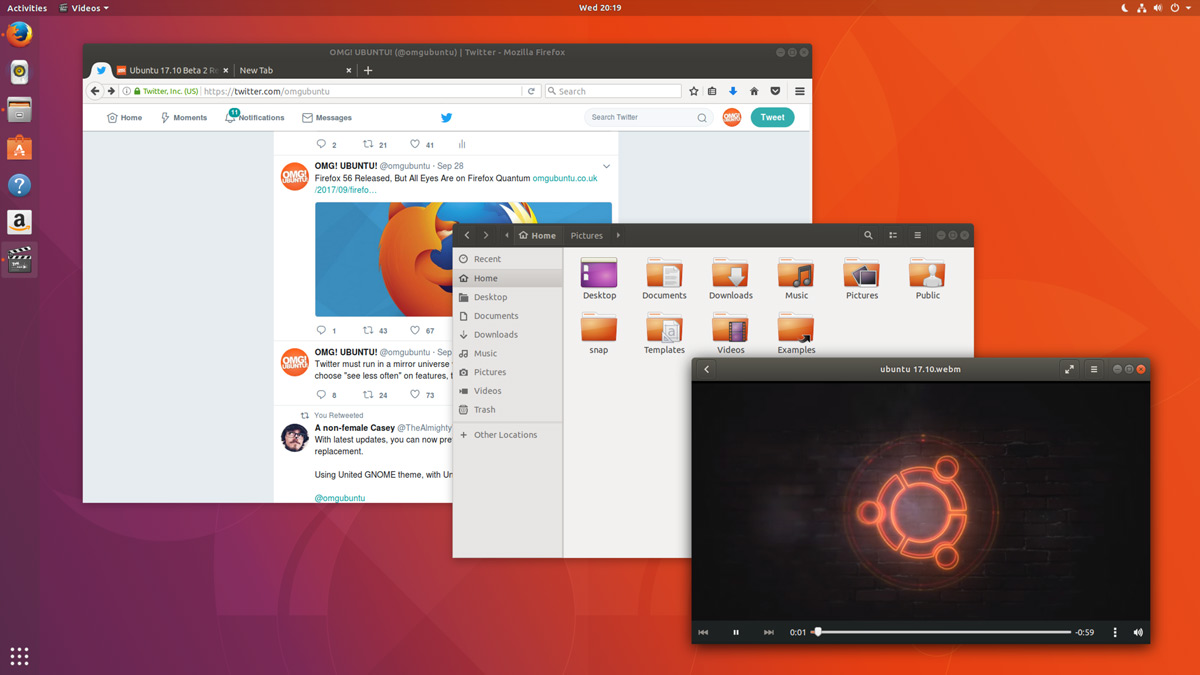
Ubuntu 17.10 Desktop
In Unity’s place comes a bespoke version of GNOME Shell that is ‘customized’ to resemble something that’s superficially close to the Unity desktop layout. The Ubuntu 17.10 desktop uses a two-panel layout: a full-height vertical dock sits on the left-hand side of the screen, while a ‘top bar’ is stripped across the top.
The top bar plays host a new type of app menu, a calendar applet/message tray, app indicators, and a unified status menu for managing network, volume, Bluetooth and user sessions.
Ubuntu Dock
The new Ubuntu Dock is both a task manager and an application launcher. It shows icons for open and running software windows as well as ‘pinned’ launchers for user’s favorite apps.
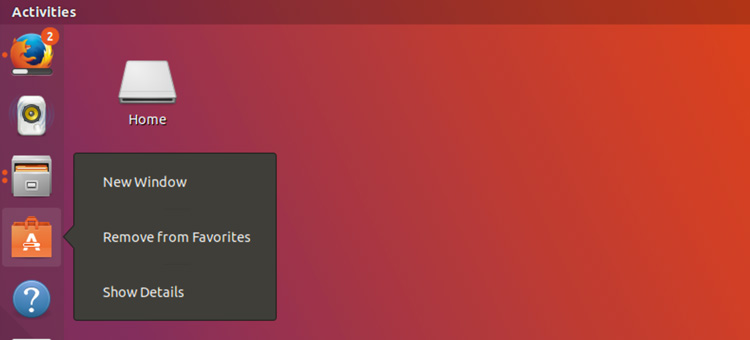
Ubuntu Dock
The dock is also global; it displays icons/applications from all workspaces regardless of which one user is actually viewing.
Both the Ubuntu Dock and the top bar are semi-transparent, which adds nice visual presence. When a window touches either element the “dynamic transparency†feature kicks in to render both dock and top bar darker, making panel label contents more legible in the foreground.
Activities & Workspaces
The main “desktop†area remains a usable space on which user can place icons, folders and files.
Though there’s no longer a true global app menu, but the majority of apps place a small menu in the top bar bearing the name of the app in focus. These app menus contain a solitary ‘quit’ button at the least, or a full complement of options at most.

Activities & Workspaces
Workspaces are a common feature found on most modern desktop operating systems including Windows 10, so it’s a good thing that Ubuntu hasn’t ditched them. User can easily move windows between workspaces by clicking on a window and moving it on over the workspace.
Applications Overview
In Ubuntu 17.10 Applications are listed alphabetically, ordered into scrollable pages. User can launch an application by clicking on it, selecting it with keyboard arrow keys and pressing enter, or by touching it.
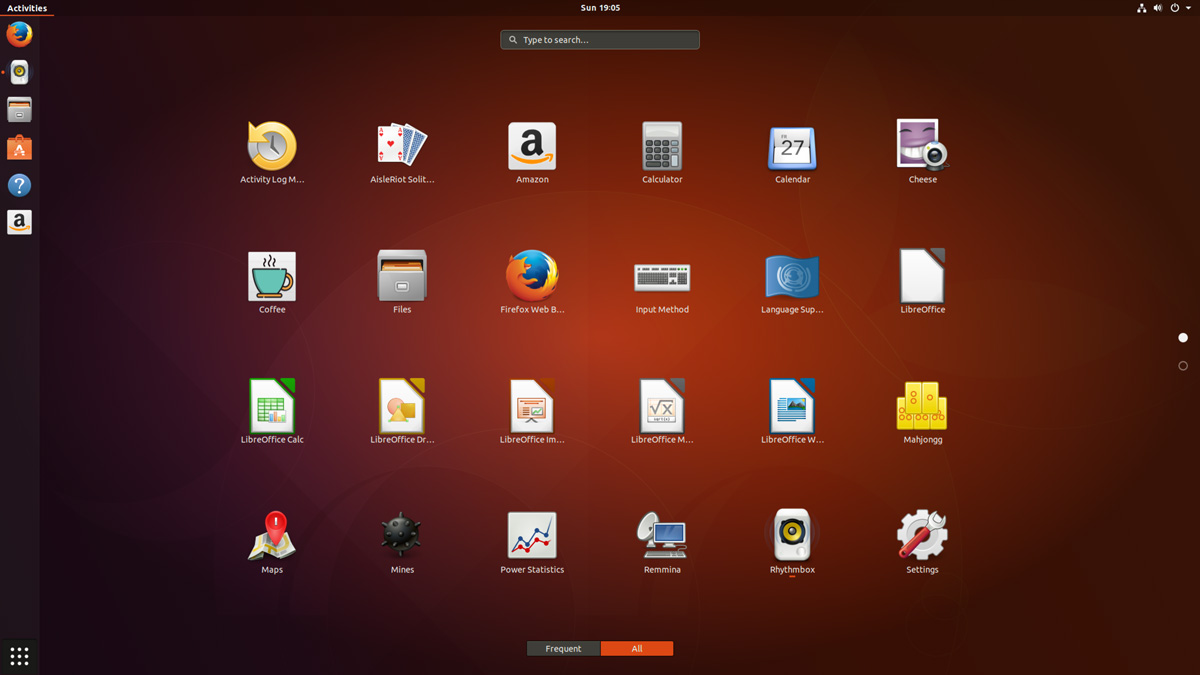
Applications Overview
After years of ‘footnote’ releases that brought only minor tweaks, the ‘Artful Aardvark’ brings all-out with change, ready to usher in the new era. Under the hood, there have been updates to many core packages, including a new 4.13-based kernel, glibc 2.26, gcc 7.2, and much more in Ubuntu Desktop. Let’s have a brief list view on some of those updates.
- On supported systems, Wayland is now the default display server. The older display server is still available: just choose Ubuntu on Xorg from the cog on the log in screen.
- GDM has replaced LightDM as the default display manager. The login screen now uses virtual terminal 1 instead of virtual terminal 7.
- Printer configuration is now done in the Settings app: Choose Devices and then Printers. The tool uses the same algorithms for identifying printers and choosing drivers as the formerly used system-config-printer, and makes full use of driverless printing to support as many printers as possible.
- The default on screen keyboard is GNOME’s Caribou instead of Onboard.
- Calendar now supports recurring events.
- LibreOffice has been updated to 5.4.
- Python 2 is no longer installed by default. Python 3 has been updated to 3.6.
- The ‘Rhythm box’ music player now uses the alternate user interface created by Ubuntu Budgie developer David Mohamed.
- The Ubuntu GNOME flavor has been discontinued. If a user is using Ubuntu GNOME, he will be upgraded to Ubuntu.
Note: Install gnome-session and choose GNOME from the cog on the login screen if user would like to try a more upstream version of GNOME. If any user’ d like to also install more core apps, he’d install the vanilla-gnome-desktop met package.
    Not only the Ubuntu 17.10 Desktop but also, there are significant changes into the Ubuntu 17.10 Server version too. For the Ubuntu Server 17.10, the OS Version for the printing server has been increased to announce Windows Server 2003 R2 SP2 ID mapping checks added to the testparm(1) tool. There are some ID mapping backends too, which are not allowed to be used for the default backend. Winbind will no longer start if an invalid backend is configured as the default backend. The others are as follows,
Ubuntu 17.10 Server
Qemu 2.10
Qemu has been updated to the 2.10 release. Since the last version was 2.8.
Among many other changes there is one that might need follow on activity by the user/admin: Image locking is added and enabled by default. This generally makes execution much safer, but can break some old use cases that now explicitly have to opt-in to ignore/share the locks by tools and subcommands using the –force-share option or the share-rw dqev property.
Libvirt 3.6
Libvirt has been updated to version 3.6.
LXD 2.18
LXD was updated to version 2.18. Some of the top new features of LXD 2.18 are:
- Native Ceph RBD support.
- Support for cloud instance types.
- Pre-seeding of the “lxd init” questions through yaml.
- New client library.
- Improved storage handling (volume resize, auto re-mapping on attach, …).
- A lot of small improvements to the client tool.
DPDK 17.05.2
Ubuntu 17.10 includes the latest release of DPDK that has stable updates: 17.05.2. This made it possible to integrate Open vSwitch 2.8.
Open vSwitch 2.8
Open vSwitch has been updated to 2.8. Though user need to specify dpdk devices via dpdk-devargs.
New BIND9 KSK
The DNS server BIND9 was updated to include the new Key Signing Key (KSK) that was published on July 11, 2017. Starting on October 11, 2017, that key will sign the root zone key, which in turn is used to sign the actual root zones.
Cloud-Init
The cloud-init version was updated to 17.1. Notable new features for cloud-init are as follows,
- Python 3.6 support.
- Ec2 support for IPv6 instance configuration.
- Expedited boot time through cloud-id optimization.
- Support for netplan yaml in cloud-init.
- Add cloud-init subcommands collect-logs, analyze and schema for developers.
- Apport integration from cloud-init via ‘ubuntu-bug cloud-init’.
- Significant unit test and integration test coverage improvements.
Curtin
The Curtin version is updated to ‘0.1.0~bzr519-0ubuntu1’. New features are:
- Network configuration passthrough for ubuntu and centos.
- More resilient UEFI/grub interaction.
- Better support for mdadm arrays.
- Ubuntu Core 16 Support.
- Improved bcache support.
Samba
Samba is updated to version 4.6.7. Important changes in the 4.6.x series are:
- Multi-process Net logon support.
- New options for controlling TCP ports used for RPC services.
- AD LDAP and replication performance improvements.
- DNS improvements.
    There are many other changes too. We recommend that all users read the release notes, which document caveats, workarounds for known issues, as well as more in-depth Release Notes.
    Users of Ubuntu 17.04 will be offered an automatic upgrade to 17.10. As always, upgrades to the latest version of Ubuntu are entirely free of charge.
Remember, here at eRacks, we offer pre-installed Ubuntu 17.10 Artful Aardvark with our new systems either directly from the OS dropdown, or by custom quote.
Asif Raihan October 25th, 2017
Posted In: Debian, Linux, Open Source, servers, ubuntu
Tags: linux, New products, Open Source, OS, ubuntu
Docker says:Â “Available for both Windows and Mac” – WTF?
![]() Docker, Please – “Available for both Windows and Mac” Are you kidding?
Docker, Please – “Available for both Windows and Mac” Are you kidding?
This reminds me of the legendary line from the Blues Brothers movie:
“We got BOTH kinds of music – Country AND Western!”
Sheesh.
Lame – it’s all based on Linux! Â And Open Source!
Docker runs natively on Linux – the only way to get it to run on Windows and/or Mac, is to run it inside a VM (Virtual Machine), running Linux. Ahem.
So apparently that’s what this does, although you couldn’t tell by the name, the marketing blurb, nor the description.
DOCKER TOOLBOX
The Docker Toolbox is an installer to quickly and easily install and setup a Docker environment on your computer.
Available for both Windows and Mac, the Toolbox installs Docker Client, Machine, Compose and Kitematic.
Source: Docker Toolbox | Docker
Sigh.
j
joe October 9th, 2016
Posted In: Linux, Open Source, Technology, Uncategorized
Tags: linux, Open Source, Technology
Mint 18 is here!
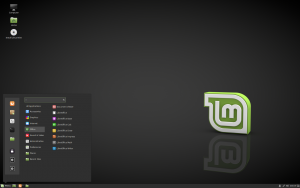 Linux Mint 18 is now available!
Based on Ubuntu 16.04, which was made available in April, this release of Mint is based on the LTS release of Ubuntu, rather than following the twice-yearly updates – and will have only incremental changes and updates over the next 2 years – thus being more stable and predictable, and avoiding any potential instabilities introduced by the biannual Ubuntu upgrades.
So Mint 18 should now be available in all the eRacks product dropdowns – if you don’t see it on the model you want, please contact us and we’ll fix it or give you a custom quote with Mint 18.
As always, contact us at info@eracks.com for any inquiries or questions regarding the Mint 18 release, or any of our products, and what release we recommend for you and your unique needs.
j
admin August 3rd, 2016
Posted In: Linux, Mint, News, ubuntu, Upgrades