
eRacks Systems Tech Blog
Open Source Experts Since 1999
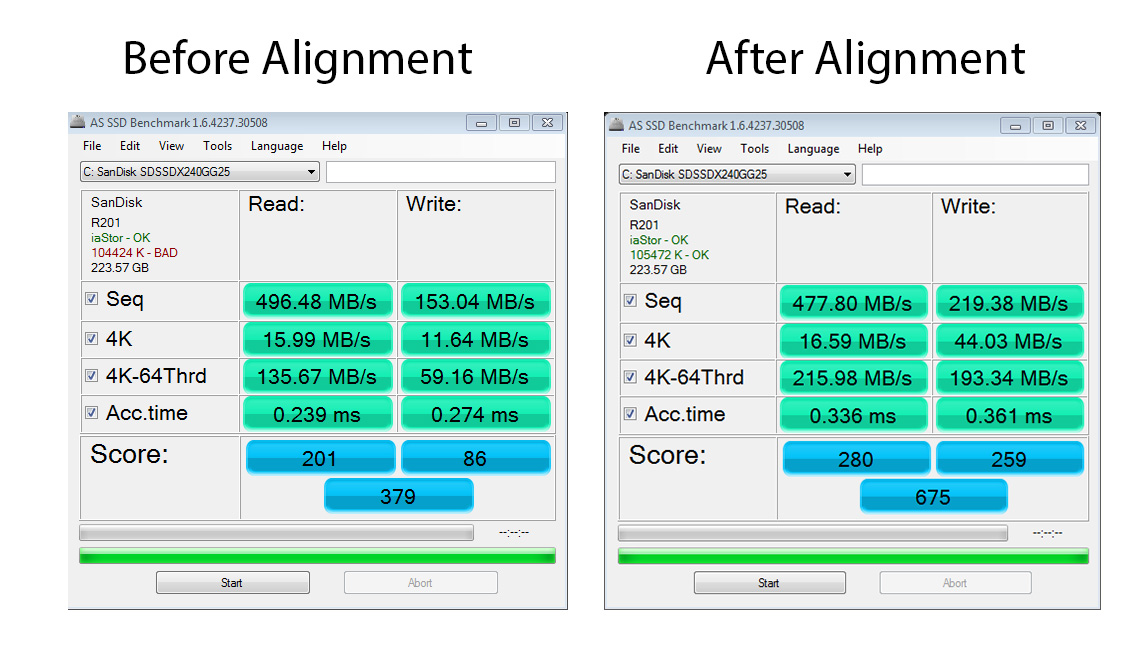
Proper alignment of your SSD using Gparted open source software

I recently bought a laptop from Amazon. I found a really good deal on a Sandisk Extreme 240GB solid state drive, so it only made sense to swap out the hard drive. Rather than going through the hassle of re-installing Windows from scratch and then installing a dozen drivers, I decided to go the easy route and just clone the hard drive with Clonezilla onto the new SSD. I loaded the SSD into an external hard drive enclosure, connected it to the laptop, and fired up Clonezilla. In less than an hour, I had a perfect copy of Windows on my new drive. Well, almost perfect. If your hard drive has failed, ASAP Data Recovery can help you recover your invaluable data in no time.
Greg August 20th, 2012
Posted In: Uncategorized
eRacks launches Amazon storefront
 eRacks Open Source Systems announces a new custom line of pre-configured ‘ready to ship’ desktop computers, rackmount servers, and Network Attached Storage servers. The new line was designed and assembled by eRacks expert team of computer engineers in their Southern California facility. Consumers will now have access to the same custom built enterprise-level computer systems used by NASA which were previously unavailable to the general public. The entire line of systems is also fully upgradeable. The ability to upgrade will typically extend the life of most systems by several years, saving consumers substantial time and money.
One of the highlights of the new Amazon storefront is the AresPro Dual Xeon Sixteen Core
desktop workstation. The AresPro line is the undiluted resolution for engineers, striking designers, video editors, high-end gamers, and video diversion designers seeking for an affordable and entirely upgradeable system. The eRacks AresPro line delivers more estimate power, better graphics performance and more storage options than anything else on the market. The sixteen core AresPro features a fractal design tower with a 1000watt PSU, SuperMicro X9DAI-0 Motherboard, dual Intel Xeon E5-2650 2.0GHz eight-core processor,32GB 1600MHz DDR3 Memory ,2 x 2TB SATA3 7200rpm hard drives, RAID 1, Nvidia 560TI Graphics, Asus Xonar DG 5.1 Sound Card, Blueray Burner, and Windows 7 Ultimate 64-bit OS. All eRacks systems come with a Standard 1yr full / 3yr Limited Warranty, which includes one full one year parts and labor, and up to 3 years of individual components’ warranties as included by the manufacturer.
Greg July 30th, 2012
Posted In: Uncategorized
eRacks/iDESQ7: An Intel Core i7 based highly-customizable Desktop System

Greg June 13th, 2012
Posted In: Uncategorized
AresPro line of high-end desktops now available online

This eRacks/ARESPRO8 system uses a single socket motherboard and supports up to 8-cores. If you need more power, see the AresPro Dual Socket systems: eracks/ARESPRO12 and the eracks/ARESPRO16 .
Greg May 30th, 2012
Posted In: Uncategorized
eRacks announces AresPro line of high performance desktop computers: an affordable and fully upgradeable workstation custom tailored for engineers, graphic designers, video editors, and gamers

eRacks Open Source Systems announces the AresPro line of high-performance fully customizable desktop workstations powered by the Intel Xeon chipset. The AresPro line is the perfect solution for engineers, graphic designers, video editors, high-end gamers, and video game designers looking for an affordable and fully upgradeable system. The eRacks AresPro line delivers more processing power, more graphics performance and more storage options than anything else on the market.
The 16 core AresPro will easily be able to handle even the most demanding programs such as Maya, CAD, SAS Enterprise, 3ds Max, Ableton, and Avid. It features two 8-Core Intel Xeon processors, 8GB DDR3 SDRAM expandable to 768GB, NVIDIA GeForce 560ti graphics card, and expandability up to 10 4TB hard drives. SSD, liquid cooling, rackmount chassis and quietization options will also be available online through the eRacks website. AresPro is compatible with the entire line of M-Audio hardware and supports Windows 7, Ubuntu, Centos, Linux Mint and many other Linux distros. The AresPro line is also fully upgradeable, so you won’t have to worry about replacing it in a few years.
eRacks customization options make the AresPro line one of the most cost efficient purchases available in the high-end computer market. Every system is built in-house by eRacks in their California facility. Users will be able to work closely with the experts at eRacks regarding any questions about capabilities, compatibility and special system requirements. The unparalleled level of customer service ensures users get exactly the system they need.
eRacks focus on an upgradeable design is good for the environment and suitable for e-waste recycling, Greenbox.com.au too. Reducing waste during the assembly process, the focus on sustainable design, and a trade-in program for old computer systems all helps to keep harmful e-waste out of landfills.
Greg May 16th, 2012
Posted In: Uncategorized