
eRacks Systems Tech Blog
Open Source Experts Since 1999
LSI Logic 6Gbps mps Driver for FreeBSD 8.2-RELEASE
EDIT: Binary modules have now also been provided for 7.4, 8.1 and 8.0. The instructions below should apply to all three, with the exception that you’ll want to download either mps-bin-7.4.tar.gz, mps-bin-8.1.tar.gz or mps-bin-8.0.tar.gz.
Unfortunately, the mps driver, which supports LSI Logic’s 6Gbps series of RAID controllers, didn’t make it into the FreeBSD kernel until after 8.2-RELEASE. As a result, FreeBSD users who require this driver are forced to either install 8-STABLE — which, despite the name, is a development branch — or pull the driver’s source code from 8-STABLE and build it on FreeBSD 8.2-RELEASE. Since we recently needed to use the mps driver and had to stick with a production-ready release, we opted for the second option. Along the way, we decided to bundle up the driver’s source to make the task easier for those who don’t want to install a development branch, and to pre-compile binary modules for those who wish to install 8.2-RELEASE directly to the hardware RAID array.
If you have a separate hard drive for the operating system that’s not on a 6Gbps LSI controller and simply use the hardware RAID for additional storage, you can do a normal install of FreeBSD 8.2-RELEASE to the hard drive, boot into the new system and perform the following steps:
1) Download mps.tar.gz
2) Extract it, cd to the ‘mps’ directory and type make && make install
3) Edit /boot/loader.conf and add the following line at the end: mps_load="YES"
4) Reboot (or type kldload mps.ko without rebooting)
If instead you want to install 8.2-RELEASE directly to an array on your 6Gbps LSI controller, a few extra steps are required.
First, download mps-bin.tar.gz, extract it by typing tar -zvxf mps-bin.tar.gz and place the contents on some form of removable media mountable by FreeBSD. A USB thumb drive, a floppy disk or a CD will suffice (though, a CD would be an awful waste of space… :))
Second, make sure to download the FreeBSD DVD and not the CD. We will require the live filesystem that’s contained only on the larger DVD. Once the installer is running, choose your language as usual, then select “Fixit” instead of the usual installation method. Choose the CDROM/DVD option.
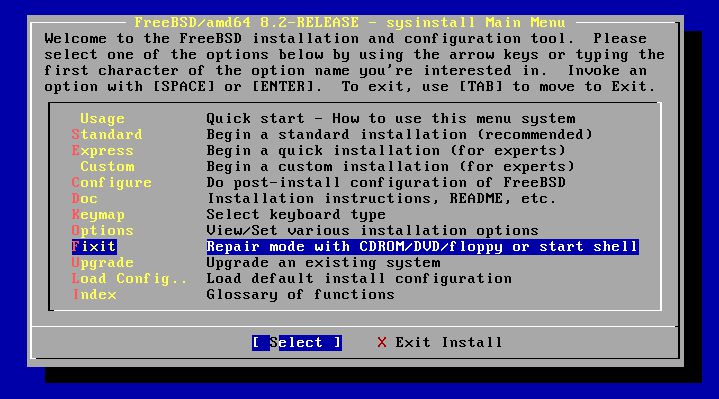
Figure 1: Select 'Fixit' instead of an installation method
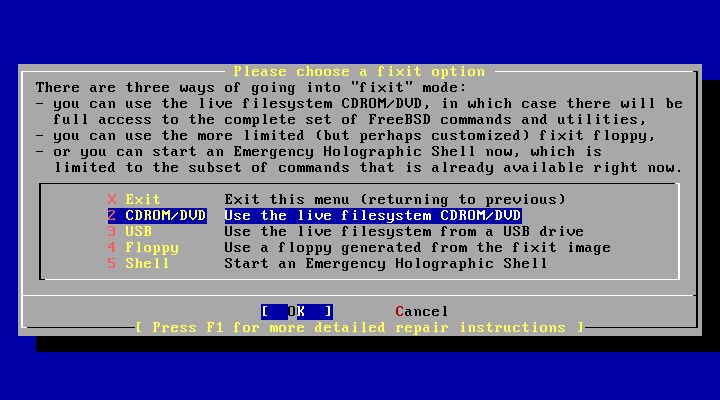
Figure 2: Select 'CDROM/DVD'
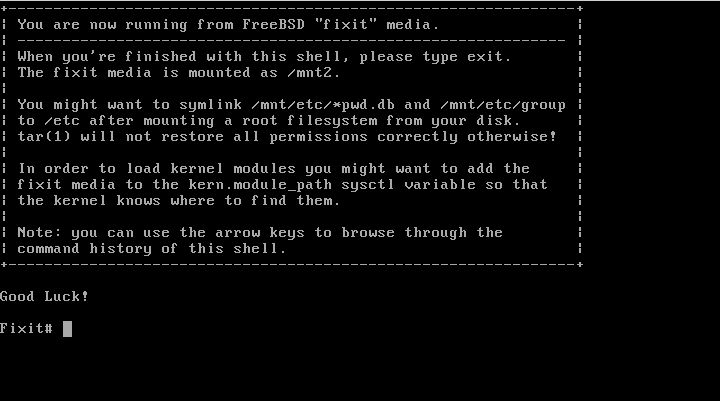
Figure 3: The 'Fixit' Prompt
Now, insert your removable media. For our example, we’ll assume a USB thumb drive with a device node on /dev/da0.
Before continuing, let me first warn you that the ordinary mount command will most likely not work. Usually, mount will determine the filesystem type and automatically call the appropriate binary. However, the way the live filesystem is setup, this doesn’t work — or at least, it didn’t work on my machine. So instead, you’ll want to call the command for your filesystem type directly. If it’s a CD, that command will be mount_cd9660. If you’re using a USB thumb drive with a FAT32 filesystem on it (as we will be in our example), the command will be mount_msdosfs.
Assuming our example with the USB thumb drive, you’ll issue the following commands:
#mount_msdosfs /dev/da0 /mnt
#cd /mnt/mps-bin/i386 for 32-bit (or #cd /mnt/mps-bin/amd64 for 64-bit)
#kldload ./mps.ko
#exit
At this point, you’ll be returned to the FreeBSD installer. Make sure to re-insert the DVD, then continue with the installation as usual. Once the installation is complete, don’t reboot! If you do, you won’t be able to start up FreeBSD, as we still have to install our kernel module and tell the boot loader to load it on boot.
So, now that the installation is finished, re-insert the DVD and return to the Fixit prompt. Once again, choose the ‘CDROM/DVD’ option. Assuming our USB thumb drive on /dev/da0 from before — the commands you use will differ based on the media you choose — type the following commands:
#mount_msdosfs /dev/da0 /mnt
#cd /mnt/mps-bin/i386 for 32-bit (or #cd /mnt/mps-bin/amd64 for 64-bit)
#./install.sh
If all goes well, the shell script will terminate without any output. Incidentally, it’s worth mentioning that the newly installed root filesystem is mounted on / when you enter the Fixit environment after installation. Now that we have the kernel module installed, we just need to tell FreeBSD to load it on boot. To do so, we just have one last command:
#echo 'mps_load="YES"' >> /boot/loader.conf
That’s it! Just unmount your media and exit the Fixit prompt.
#umount /mnt

#exit
At this point, you can exit the installer as usual and reboot. Once the system starts, you should find yourself face to face with a shiny new instance of FreeBSD 🙂
james August 10th, 2011
Posted In: FreeBSD, How-To, Open Source
Tags: 6gbps, 7.4-release, 8-stable, 8.0-release, 8.1-release, 8.2, 8.2-release, binary, driver, freebsd, howto, kernel, kernel module, lsi, lsi logic, module, mps, Open Source, raid, source, stable, tutorial
Open Source Software: A Student’s Dream Come True
If you’re a student like I am, you know how important it is to save money. Some students are too busy with their studies to work at all, and those who can are usually only able to do so part-time. And, like books and tuition, software is a significant source of financial burden to the average student. While it’s true that student licensed versions of software are significantly discounted, popular titles such as Microsoft Office will still cost you somewhere in the ballpark of $130. And of course, that’s only if you don’t intend to use the software for anything other than your academic or personal endeavours. If you utilize the same applications on the job, you’ll find that you’re no longer eligible for student licenses, and suddenly you’ll discover that $130 magically turns into $300.
Fortunately, the current digital climate is rife with free software alternatives, which have the potential to save students (or parents!) hundreds of dollars.
The Operating System
Let’s start with the most fundamental bundle of software, the operating system (hereby abbreviated as OS.) The OS is what sits between the hardware and the user’s applications. Some examples are Microsoft Windows and Mac OS X.
For many students, purchasing an OS will be a non-issue, as most computers come with one pre-installed. For those in this category, most of the software mentioned below will run on both Windows and Mac. That being said, there are also a significant number of people who need to include an OS in their financial plans. Perhaps you purchased your computer used and without software. Or, maybe the OS on your machine is old and needs to be upgraded. You could have even assembled your own computer, as many hobbyists do.
It’s true that students can purchase Microsoft Windows at a discount of 30-60% off, but why would you do that when you can get your OS for free? Over the last few years, a veritable cornicopia of easy-to-use free software-based OSes have emerged, the most popular, and in my opinion, the easiest to install and use, being Ubuntu (http://www.ubuntu.com/). For the more technically inclined and perpetually curious, there are a slew of other Linux distributions, as well as the *BSD family of OSes — FreeBSD (http://www.freebsd.org/), NetBSD (http://www.netbsd.org/), OpenBSD (http://www.openbsd.org), PC BSD (http://www.pcbsd.org/) and Dragonfly BSD (http://www.dragonflybsd.org) — and Sun’s OpenSolaris (http://www.opensolaris.org/).
In reality, we do still live in a Windows world, so you may find yourself in a position where you have to use a program that only runs on Windows. Luckily, there’s a very mature and very complete open source implementation of the Windows API that’s been actively developed since 1993 called WINE (http://www.winehq.org/) You simply install WINE through the point-and-click interface provided by your OS and install your Windows applications on top of it. Many will run out of the box, and others will run with a minimal amount of tweaking.
Office Productivity
As mentioned earlier, a student copy of Microsoft Office will cost roughly $130, and in some cases, students won’t even qualify for the student license, making the product much more expensive. So then, simply by installing a single free software replacement, you’ve literally saved hundreds. There’s a fantastic open source alternative called OpenOffice (http://www.openoffice.org/), a spin-off from Sun Microsystems, Inc. The download is a little large (over 100MB), but the price tag is worth it (it’s free), and OpenOffice really is a solid application capable of doing anything Office can. It includes components that replace Word, Excel, Powerpoint and Access, as well as additional components for drawing and for editing HTML documents.
In addition, you’ll find Scribus (http://www.scribus.net/) for desktop publishing and the creation of professional quality PDFs and Dia (http://live.gnome.org/Dia) for drawing diagrams, roughly like Microsoft Visio.
Multimedia
Of course, no college-ready system is complete without the ability to play movies and music! Fortunately, open source has you covered there as well. With Totem (http://projects.gnome.org/totem/) and Xine (http://www.xine-project.org/), playing your videos on Linux is a snap (Windows and Mac users of course have their own respective built-in players and don’t have to worry about this.) As well, there are applications like Banshee (http://www.banshee-project.org/) that do a great job of managing your music (it also plays videos.)
You’ll also more than likely be managing a great deal of pictures. For editing them, you’ll find the GIMP (http://www.gimp.org/), which is very similiar to Adobe’s Photoshop, and for browsing and managing your pictures there’s F-Spot (http://f-spot.org/).
You’ll only run into a couple of hitches when dealing with multimedia on an open source OS. The first is that you won’t be able to play many Windows Media files. Fortunately, this can remedied by purchasing the Fluendo Windows Media Playback Bundle (http://www.fluendo.com/shop/product/windows-media-playback-bundle/). True, it’s not free, but for $20 it’s a small price to pay compared to all the hundreds of dollars you’ll be saving on everything else, and if you can live without Windows Media, you can save yourself the expense. The second is that technically, according to the controversial Digital Millenium Copyright Act (http://www.copyright.gov/legislation/dmca.pdf), you’re in a legal predicament if you install software to decrypt your DVDs. More than likely nobody’s going to care, and the software to do so is readily available and in common widespread use, but if you choose to play your DVDs on an open source OS you should first take the time to thoroughly understand where you stand from a legal perspective. [Ed. note: there are fully licensed DVD players available for Linux, but even so, legal scholars now feel that this area of the DMCA has not yet been fully tested in court, but recent precendents suggest that if it were, in the end, that Fair Use doctrine would win out in the end over the DMCA – Ed.]
A Plethora of Other Goodies
Depending on your field of study, you’ll find many other professional-quality free and open source applications that are outside the scope of this blog that will save you even more money. Just google around. You’ll find all sorts of amazing applications, all of them free.
Conclusion
Fellow students, let loose the shackles of expensive proprietary software and embrace the freedom of open source. Not only will you save hundreds of dollars, you’ll be drawn into a community of users and developers that are passionate about writing and supporting software. Once you get used to using free software alternatives like these one from https://www.sodapdf.com/pdf-editor/, you’ll wonder how you ever got by without it.
Here at eRacks, we specialize in providing users of all kinds with open source solutions to meet their needs. So contact us today, and ask us how we can help you save money and get even more out of your academic experience!
james April 20th, 2009
Posted In: How-To, multimedia, Open Source, Reviews, ubuntu
Tags: FLOSS, Open Office, recession-proof, Review, unix
Fedora and wireless with Prism54
I will relate a recent battle I had with a laptop that uses the Prism54 wireless chipset and runs Fedora 10. For quite some time, I could not get it to connect to a WPA protected network. With an open network, it would connect just fine. I didn’t bother with WEP. I wanted to find out what was causing it to fail with WPA.
This is an older eRacks CENTRINO laptop (Pentium M 1.6ghz, 1GB RAM and an 80GB hard drive.) This post will also hopefully help anyone else who has a laptop with the Prism54 chipset (mine specifically is a PrismGT mini-pci card.) Note that Prism54 is also available in PCI and USB wireless devices.
At first, I thought it might be a problem with the GNOME NetworkManager. So, I tried other methods of connecting, such as using the command line (for iwconfig/ifconfig), wicd, Wireless Assistant and WiFi Radar. Some of these seem to work better than others, but again, none would allow me to connect to my WPA protected network at home. Thus, it was time to dig deeper.
After some sifting through forum posts, blogs, and bugzilla, I finally came across something that might help. Apparently, the prism54 drivers have several different modules that are loaded. For some reason, there is a module (prism54), which might be an older version of the complete set, and then there are other separate ones: p54common, p54pci and p54usb. So in my case, it was loading prism54, p54common, and p54pci. According to what I have read, the prism54 module causes conflicts with the newer p54common and p54pci set. The suggestion for now is to add prism54 to the module blacklist, located in /etc/modprobe.d/blacklist. You add the following entry at the bottom:
blacklist prism54
Once I did this and restarted networking, I could connect to my WPA-protected network using the default GNOME NetworkManager. All is well again in WiFi land.
Hopefully, this little jaunt with prism54 will be able to help someone else.
Matt March 13th, 2009
Posted In: How-To, Laptop cookbooks
How to Avoid Pain and Suffering when Upgrading Desktop-Oriented Linux Distributions
This article is geared toward eRacks customers who have a desktop or laptop system, i.e. a personal workstation. It is not intended to serve as a guide for customers wishing to upgrade a server.
With the above in mind, for those who use Linux on such a machine, your choice of distributions that cater to this niche is growing nicely. You have the “Big Boys” such as Ubuntu, Fedora, Mandriva or OpenSUSE, as well as a host of more specialized distributions, the main focus of most being on user friendliness and “up-to-dateness.” What this usually leads to is a faster upgrade cycle than what you would typically find on a server oriented distro such as Debian (stable), RedHat Enterprise, SuSE Enterprise or CentOS.
I myself have been tracking RedHat (including Fedora) since version 5.0, doing a mix of upgrades and fresh installs. I have also kept up with Ubuntu since 6.04, and have had similar experiences with it. I have found that one way of making regular upgrades easier is to keep a separate /home partition. This way, you have a choice of an upgrade or a fresh install, without losing valuable data.
My experience, and that of many other salty seasoned Linux gurus, is that upgrading from a previous version tends to be a bit messier and usually takes longer to do than a fresh install. This can be true, especially if you use third party repositories, if you install software not maintained by your distro package manager (DEB or RPM) or if you do a lot of tweaking. Doing so may leave you looking at a broken system when the upgrade finishes. For this reason, it is usually more desirable to do a clean installation and install your third party applications afterward.
How then to keep from losing your data? Many system admins would suggest the multiple partition method, which has been used on servers a lot, yet not so much on the desktop. The multiple partition method can have advantages and disadvantages, but since hard drives are so big these days, many of the disadvantages are no longer prevalent.
While most modern desktop distros have a default partitioning scheme that gives you just a swap partition (usually about 2x the amount of RAM, or physical memory) and a large root partition for everything else, most server configurations have multiple partitions for directories like /usr or /var, which can have many advantages. For example: if you wanted to have /usr mounted as read-only to prevent unauthorized system-wide software installs, if you wanted to keep /boot separate for a RAID array or if you wanted to keep /var and /tmp separate to avoid corrupting the core system files; these are all examples of why one might want to make use of multiple partitions. In this case, however, the partitioning must be very carefully planned according to the intended use of the server, what programs need to be installed, how many users will be logging in, etc.
Luckily, there is a happy medium that works well for desktops, and that is to use a swap partition with 2x the amount of RAM, a root partition for your operating system and a very large /home partition for all your data. When you do a fresh install, all you have to do is make sure you don’t format /home, and your data will be safe across installations. If you want to save any system-wide tweaks, you will, of course, also have to backup important configuration files and check them against their replacements, making changes where necessary.
In my case, I have a 120GB hard drive for Linux, which makes use of the following partition scheme:
20GB /
75GB /home
1GB /swap
14GB “other” (at times it has a Gentoo install, other times it has FreeBSD, depends on my mood…)
I have found through experience that this setup works well.
When I do an OS update, such as my recent one to Fedora 9, I usually backup important configuration files to /home, do a fresh install and finally install any third party programs I need.
In the past, when upgrading systems without doing a fresh install, things for me have tended to get rather wonky. However, I have recently tried upgrading Ubuntu, and I must say that the recently improved Upgrade Manager, a graphical front end to the apt-get dist-upgrade functionality, is a nice touch. It allows you to upgrade to the next version of Ubuntu, while still allowing you to run your system so you can go about your business as it downloads and installs all the packages. When it’s done, you simply reboot, and voila, new version! Upgrades on Fedora, by contrast, are still usually done by the tried and true method of booting the install disk and running the upgrade procedure. Fedora does have the capability to do upgrades using the yum package manager, but that functionality isn’t as mature as apt-get dist-upgrade, and thus is not for the faint of heart.
So now, what if you have an existing Linux installation utilizing only a single partition and you want to do a fresh install while keeping your data safe?
Of course, you could just back your data up to a large external hard drive, but not everyone has one at their disposal. In this case, what you could try is resizing your root partition, create a new partition for /home and copy your personal data to it before starting the upgrade. Then, just run through the installation as usual. This is, of course, only if you have enough space to resize. If not, you may still require an external drive, at least temporarily, to copy your data to before starting the installer.
If you want to make use of multiple partitions on a new eRacks system purchase, just ask for it during your order. This way, your system will be ready when the next OS update rolls around!
Matt
Matt June 27th, 2008
Posted In: How-To, Laptop cookbooks, Upgrades